How to use iDVD to make and burn slideshow to DVD
![]()
May 13, 2013 12:12 pm / Posted by Nelson Peter to DVD CategoryFollow @MacDVD_Studio
If you are a Mac user, and you took a lot of photos, audio or videos, you want to share them with your family or friends on TV or burn them to DVD for backup. Then this step by step guide will help you do the job. It will show you the details steps to compile your files as slideshow and burn to DVD with iDVD. Easy to understand and I'm sure you can handle it, Let's GO.
Step1. The tool you need is iDVD, and iDVD is build-in almost all Mac computers. When you open iDVD, you'll get the familiar menu with several start options. As our purpose today is to quickly and easily create an interactive DVD with our personal photos and videos, the suggested choice is 'Magic iDVD'.

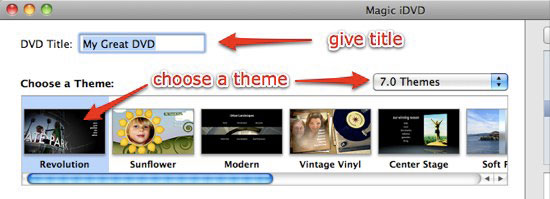
Step2. Give your project a name and choose the theme for it. There are several theme groups available. Each group has several themes to choose for. I just picked the 'Revolution' theme as it's the first choice that appeared.
Step3. Then you can browse the media folder to find items that you want to include in the DVD. The materials could be music, pictures and movies. Adding them to the project is just a matter of dragging and dropping. iDVD supports MP4 and MOV video, if your videos is not compatible with iDVD, you can follow this step by step guide to convert the video to iDVD compatible video.

Hit 'preview' to see what the end result will look like. A preview window will appear, complete with the remote control-like playback interface.

Tips: A regular DVD can hold up 4.7 GB files. Dual-layer DVD can hold up 8.7 GB files. If your project contains a big size of data collection, it might exceed the maximum capacity of the disc and iDVD will give you a pop-up notification. You could delete some files to reduce the size, or you could try to modify the encoder setting. To do that, open 'Project Info' from the 'Project' menu.

And choose the lower quality setting from the 'Encoding' drop down menu. Then click 'Start Project' to enter the next stage.

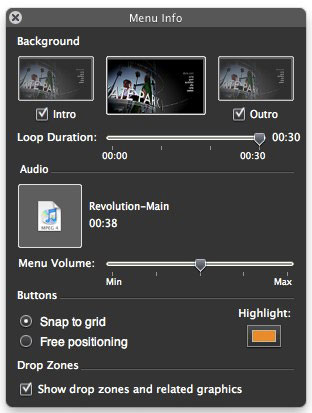
Step4. Edit the menu or add some effects (optional). There are other things that you can adjust from the menu interface. Click the 'Menu Info' button at the bottom left of the window.

The menu info window will appear. Here you can adjust the loop duration, audio volume, buttons and drop zone. You could also change the background music simply by dragging and dropping any audio file from the hard drive to the audio box.
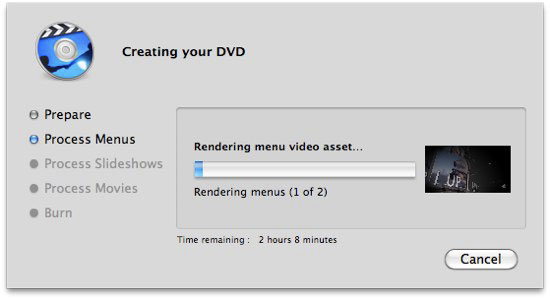
Step5. The last step is producing the DVD. From the File menu choose 'Burn DVD'. You could also save the DVD as an ISO image to store in the hard drive.

And all that's left to do is wait. The time will depend on how big your files are and how strong your Mac is. You could do something else while iDVD handle the necessary steps one by one. After that, you can share the memory DVD with your family or friends on DVD player, I love that moment.
If you want to make copies of the DVD you created for your families or friends, for example wedding party. You can follow this step by step guide copy DVD to another blank DVD on Mac.


