The official iOS 8 was released a few days ago, you must exist to upgrade to it. But there are some bugs for iOS 8, if you are regret to update to the iOS 8, here is a step by step guide help you downgrade from iOS 8 back to iOS 7. Easy to follow, even you are computer newbie can handle it.
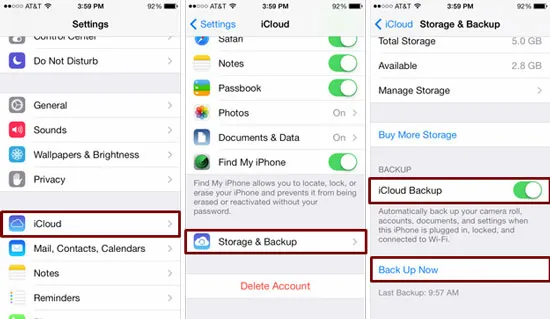
Tips: You’d better to backup your data before the downgrade. iCloud and iTunes can help you do the backup. I’d recommend the iCloud method, it’s easier. Go to your iOS device ‘Settings’ -> ‘Storage & Backup’, turn on the ‘iCloud Backup’, and click ‘Back Up Now’. The backup will be start automatically, it will take a few minutes to finish the backup.
Now. Let’s Start the steps to downgrade iOS. I will take my iPhone as sample in this guide, the operation steps are the same for iPad and iPod Touch.
Step1. Turn off the iPhone. Push the Home button and hold it, while you plug it into the computer. Wait until you see the screen that announces you to connect to iTunes.
Step2. iTunes should announce you that an iPhone is in the recovery mode. It needs to be restored if you want to use it. Click OK.

Step3. Restore the device by clicking the Restore iPhone. A new window will appear. It will ask you if you are sure about restoring your device. Click on the Restore and Update button.
Step4. iTunes will start downloading the official firmware, which is iOS 7.1.1. When the download is done, it will be installed automatically.

Sometimes, you will find your iPhone is stuck in ‘Connect to iTunes’ screen, and then you can follow this guide to get your iPhone out of recovery mode.
If you need more detail steps, here is a step by step video guide from YouTube to help you downgrade from iOS 8 to iOS 7.
- 3 solutions to convert facebook video to mp3 - January 10, 2018
- Quicktime Screen Recording FAQs and Free Alternatives - December 31, 2017
- How to use computer to uninstall Android Apps - September 28, 2017