DVD Creator FAQs
-
1. How to make a photo slideshow
It's easy to make a photo slideshow with DVD Creator for Mac. After importing multiple photos, click the Edit button to make settings to the photo slideshow.

Tips:This application will automatically create a photo slideshow when you import multiple photos at a time. If you import photos for several times, there will be multiple photo slideshows created for your DVD movie. You need to edit these slideshows one by one. All the settings you've made to one slideshow won't affect another slideshow.
In the slideshow editing window, there are 3 tabs under the preview window: Transition, Text and Music.

In the Transition tab, you're able to make settings to all regular slideshow options like Slide Duration, Transition Effects and Transition Duration. Just select a value from the drop-down list. If you want all photos in the slideshow has the same duration and transition effect, click the corresponding Apply to All button. By clicking the Rotate button, you can easily change the orientation of the selected photo.

In the Text tab, you're able to put texts on the photos. Just type anything you want in the Text field and use the Location adjuster, or drag the text in the preview window to change its position. Also make changes to Font, Font Size and Font Color as you want. Click Apply to All to add the same texts to all photos in the slideshow.

It's easy to add background music to your slideshow. To do so, switch to the Music tab and drag your favorite music from your Mac to the Music field. Click the Play button to listen to the music. If necessary, trim the background music to match your slideshow by dragging the Two sliders. Click Play trimmed part to play the trimmed music. Drag the Volume slider to adjust the music volume. You're also able to add Fade in and Fade out effects to your background music.
-
2. How do you apply a DVD menu template?
Click the Menu button at the bottom right corner to enter menu editing mode.

4 types of DVD menu templates are included in the Template types list: Dynamic Template, Static Template, 1.0 Template and My Template.
Tips: 1. To add a template to My Template favorites list, right click the template, and choose Add to My Template. 2. By clicking More Templates, you can download more DVD templates from our official website.
Simply double click a DVD menu template to apply it to your DVD. If you don't want any DVD menus, just choose No Menu at the end of the Templates list.
Dynamic Templates are dvd menu templates with animated backgrounds. The Frame, Button and Text are set by the application and can't be changed. But you are able to change the chapter thumbnail and add background music to the template. To do so, click the Advanced Settings button and change the Chapter Thumbnails and add background music as you want.
Static Templates and 1.0 Templates are still DVD menu templates. You're free to change the Detail Settings like the Frame, Button and Text of the menu.
Simply double click a frame or a button, and you can choose the frame or button from the list.
Tips: Right click a frame or a button, and choose Replace all frames of the current page or Replace all buttons of the current page to change all the frames or buttons in the DVD menus.

You're able to change positions of the thumbnails, button and texts by dragging and dropping. To change the Thumbnails, Background and add Background Music to your DVD menus, click the Advanced Settings button and in the window that opens, drag your own image/music to the dashed rectangle.

Tips: You can edit the background music easily. Trim the audio file by dragging the Two sliders. Click Play trimmed part to play the trimmed audio file. Drag the Volume slider to change the music volume. You're also able to apply the Fade in and Fade out effects to the background music. Just check them and make settings to the effect duration.
Depending on the Aspect Ratio of your DVD movie, you can set the Aspect Ratio to 4:3 or 16:9 under the preview window.
-
3. How to fix the error "Leave the driver alone for a while and try again"
As regard to this error, first make sure your DVD drive works normally. How do you check your DVD-Drive? Follow this: Without running the application, right click a video on your computer and select Burn ... to disc. If the error message appears, it's probably your DVD drive needs a thorough check.
If the error only appears while using the application, you're recommended to restart your computer and let your DVD drive alone for about 20 minutes and try again. Sometimes the continuous use of DVD drive will result in this error.
Alternatively, you can try burning DVD disc with Disk Utility instead. To do so, choose ISO File after clicking Burn in our application. An ISO file will be created on your hard drive. You can then burn this ISO file to a new blank DVD with Disk Utility (a built-in burning software by Apple): Then start Disk Utility and go to Images > Burn in the top menu bar to import the ISO file to Disk Utility. Finally, insert a blank DVD disc to your DVD drive and start burning ISO to DVD.
-
4. What to do If the burning progress freezes at 50%?
Generally speaking, when the burning process reaches at 50% or so, the DVD files have been created on your hard drive and are ready to be burned to DVD disc. At this point, if there's any compatibility problem, the application might stop working.
If so, you're recommended to use the method below to burn the created DVD files to a DVD disc.
1. When you finished your movie, click the Burn button. In the window that appears, select Burn to "ISO file".2. Click the Choose button to specify a folder to save the ISO file. It's a good idea to save the ISO file to Desktop so you can find it later easily. Also input name and then click Save to start creating an ISO file.
3. When it's done, open Disk Utility from Applications folder, and go to Images > Burn in the top menu bar.
4. In the resulting window, add the create ISO file to Disk Utility and insert a blank DVD disc to start burning.
-
5. What to do when I fail to load a video for burning?
If you fail to load a video into our application, first make sure your video's format is supported by DVD Creator for Mac.
http://www.iskysoft.com/dvd-creator-mac/reference.html
Also confirm the following before you load a video:
1. The video file can be played well with your media player on Mac.
2. There is both video and audio in your movie file. A video without audio or music files are not supported.
3. The length of video files is longer than 7 seconds.
4. The video is not DRM protected.If your video file can be played with VLC or QuickTime, you can also record the file to another format and try again. Here is how:
VLC: Start VLC and go to File > Streaming / Exporting Wizard... from the top menu, then choose Transcode / Save to file, and follow the on-screen instructions to transcode the your video file.
Quick Time: Play your video file with QuickTime, and go to File > Save As... on top. Your video will be encoded to another video format.Then, load the new created video file to our application.
-
6. How do you trim a video?
After adding the file to the program, you'll see an Edit button on the item bar, click it to open the Video Edit window.

Switch to the Trim tab and click the
 button to add a pair of sliders with a sequence number on them. Drag the two sliders and the segment between them is what you want. You're also able to input digits to set the Start Time and End Time.
This program supports trimming video into multiple segments at one go. Move the play slider to a new position and click the Trim button to add more trimming sliders and define the segment you want. The Start Time and End Time indicates the current time points. If you choose 1 in the segment list beside the Trim button, then the Start Time and End Time and Trimmed Length changes accordingly. To remove current segment, simply click the trash bin button.
Tips: When you've trimmed a video to multiple segments and close the Video Edit window, the program will join all segments into a single video without gap, instead of splitting it into several parts. So, if you want to split your source video into several video files, you have to import the video, trim them and save them separately.
-
7. The disc have not enough space to burn the videos. What to do?
iSkysoft DVD Creator for Mac convert and burn the source videos to standard DVD's MPEG-2 (VOB) format in one unit. When you import video, the program shows the video size in the color bar at bottom. If the video size exceeds the disc capacity, you can either change the default setting Best Performance to Standard for smaller size (but lower quality), or remove some video files. Alternatively, get a dual layer 8.5G blank disc (D9), instead of 4.7G D5 disc.
The application will alert you by messages. When the video size exceeds D9 capacity, the program will ask you whether to adjust the quality or delete some files if you click the Burn button. Similarly if the size exceeds D5 capacity, the program will remind you whether to compress video.
-
8. What can I do if the burned DVD doesn't play on my DVD Player?
If the burned DVD can't play on your home DVD Player, first make sure you've selected the right TV standard (NTSC or PAL) properly. You can set it when you click the Burn button in DVD Creator for Mac.
Also, check your DVD player's specs to see whether the DVD disc you're using is supported by your home DVD player.
If the TV standard and DVD disc type are not the reason, do the following
1. After click the Burn button, choose ISO File in Burn To option. This will save your movie to an ISO image file, which can be burned to DVD with third-party DVD burning software tools.
2. Use Disk Utility to burn the ISO file to a DVD. After open Disk Utility from Applications folder, go to the top menu to choose Images > Burn, and then load the ISO file to Disk Utility. When everything is ready, insert a blank DVD disc in the Mac to burn ISO to DVD.
If the created DVD still doesn't play on your home DVD player, contact our customer service team with information as detailed as possible for troubleshooting:
1. The brand, model name and purchasing date of your DVD player
2. The type of your blank DVD disc.
3. The version of your Mac OS X operating system.
4. Whether the burned DVD can be played on your Mac.
-
9. What are the limitations of the trial version for DVD Creator for Mac?
The trial version and registered version are the same product. The only functional difference between the trial version and the registered version is that the trial version has watermark added. You need the registerd version to remove the watermark.
After purchasing, you will get a registration code. Once you register the product, you can immediately use the product without limitation.
-
10. How to rotate videos?
Try the following operating steps, you could rotate the files.
After loading the files to the program, you can point to the video thumbnail and click Edit button appears to enter Edit panel.
Then in Edit window, select Rotate. There are four options for you to rotate the videos: -90°, +90°, Horizontal Flip, Vertical Flip. You can select the one you want. The effect is displayed in the preview window.

-
11. How do you crop a video?
After a video is added to the application, mouse over the video thumbnail and click the appearing Edit button.
In the resulting Video Edit windows, go to the Crop tab.
You'll see eight handles along with dashed borders. Drag the handles to adjust the rectangle size, only videos in the rectangle will remain, as shown in the right window.
For accurate control, you can also move the Value sliders of Position and Size to adjust the rectangle.

The Zoom list helps you crop video in specific aspect ratio. To make the video play in full screen (without black bars across the screen), do the following:
1) First cut off the blackness in the left window.
2) Select Full Screen from the Zoom list. You'll see the video fill your whole player.Note: The video might be stretched. Here's the reason: Your video was originally recorded in a ratio, but Full Screen option changed it to another aspect ratio. Therefore, if you don't want a stretched video, you need to use other Zoom options like Keep Original 16:9, or 4:3.
If you want to crop the video again, click Reset. If you're satisfied with the result, click the Close button to save the changes and close the window.
-
12. How to merge and unmerge the files?
To Merge files, drag a file and drop it onto another one, they will be merged into one chapter.
If you want to unmerge it, please drag the file out of the chapter till you see a blue line. Then the files will be unmerged.

-
13. How to make a custom background for your DVD menu in DVD creator?
First of all you need to open the software and then load your video or photo files, as seen in the screen shot below.

After this click on the Menu button at the bottom right of the main program window.
The menu side panel will now be displayed. Make sure the Menu tab is selected then from the drop down menu choose Static Template.

After this there will be several default menu templates displayed in the right hand menu pane. Please select any one of these.

From the bottom left corner of the main window select Advanced Setting. An advanced window will now be displayed. Click Background and then drag and drop the picture you want into the background picture space.

Close this window using the small x at the top left of the window. Your picture should now be displayed as the background to your menu.
-
14. What are the differences between DVD5 and DVD9?
The main difference between DVD5 and DVD9 is the capacity. DVD9 has more space than DVD5's. DVD ± R DL discs are called DVD9. The single-sided double-layer DVD discs can store data up to 8.5GB. Those single-sided single-layer DVD discs can save data up to 4.7GB. They are called DVD5.
1) The DVD5 discs are single-sided single-layer discs. DVD5 can store accurately 4,700,000,000 bytes and that is 4.37 GB on computer where 1 kbyte is 1024 bytes. A DVD5 disc can generally store a 120-min DVD movie.
2) The DVD9 discs are usually referred to single-side dual-layer discs. DVD9 store accurately 8,540,000,000 bytes and that is 7.95 GB on computer. A DVD9 disc can store a 240-min DVD movie.
To view the capacity of commercial DVDs, insert your DVD disc into your Mac's DVD drive. When the DVD icon appears on desktop, hold Control key and click the DVD icon. Then select Get Info option to view its capacity. If the capacity is less than 4.7 GB, it is a DVD5 disc. If the capacity is larger than 4.7GB but smaller than 8.5GB, it's a DVD9 disc. -
15. How to download free DVD menu templates
To download free DVD menu templates. first switch to Menu and then click More Templates to download DVD menu templates for free.
You can browse DVD menu templates and download the templates you're interested in. The DVD menu templates are compressed in .zip format. After downloaded the ZIP file, double click it to decompress. And then double click it again to install on your computer. You'll see a message saying “Templates have been installed successfully. Enjoy!” Next time when you start the application, you'll find newly added templates and use them like preset DVD menu templates.
-
16. Can I burn DVDs without menus?
Sure, you can. To do so, go to Menu tab after starting our application by clicking Menu at the bottom, in the menu list, choose the No Menu option at the end of the list. Double click it to apply.
-
17. How do you loop video when burn video to DVD?
You can loop video on DVD burned with DVD Creator for Mac by following these steps:
1. Start our application and go to DVD Creator > Preferences from the top menu, then choosing the option Play movies in sequence without returning to the main menu.
2. Close the Preferences window, and add your files to the program by dragging and dropping files to the main interface.
3. Switch to the Menu at the bottom right corner, and choose No Menu at the end of the list.
-
18. What's an ISO file?
An ISO Image file is an archive file of an optical disc based on the format defined by the International Organization for Standardization (ISO). ISO is widely supported by most DVD software. ISO Image files usually have a file extension of .iso. If you can open an ISO file, you'll see Video_TS folder and Audio_TS folder, same as what's on a DVD disc.
An ISO Image saves all data on a DVD disc and makes it easy to be rendered or burned to a DVD or CD by using disc burning software. ISO burning is a basic feature of burning software on modern home and business computer systems.
-
19. What is a .dvdmedia file?
.dvdmedia is a common file extension on Mac OS X. In fact, it's just a VIDEO_TS folder with the .dvdmedia extension. In Windows, .dvdmedia files will show as a folder. On Mac, the Mac DVD Player can directly play .dvdmedia files.
You're able to change a .dvdmedia file to a VIDEO_TS folder easily and vice versa.
How to change a .dvdmedia file to a VIDEO_TS folder:
1. Right click the .dvdmedia file, and choose Get Info.
2. Delete the suffix .dvdmedia in the Name & Extension field, and click Return.
3. Click Confirm in the window that shows up.
4. The .dvdmedia file has changed a VIDEO_TS folder.Then you can start the program, and go to File > Load DVD feature to import the DVD folder.
How to change a VIDEO_TS folder to a .dvdmedia file:
1. Right click the VIDEO_TS folder and choose Get Info
2. Enter the suffix .dvdmedia in the Name & Extension field, and click Return.
3. Click Confirm in the window that opens.
4. The VIDEO_TS folder has change to a .dvdmedia file. -
20. What's the difference between NTSC and PAL?
NTSC and PAL are two main TV standards in the world. NTSC standards for National Television System Committee, while PAL for Phase Alternating Line. Both PAL and NTSC are analog systems that deliver TV signals so you can watch TV at home. With the growth of digital television all around the world, NTSC and PAL will disappear one day.
Countries using NTSC vs PAL
NTSC is mainly used in US, Canada, Chile, Japan, Mexico, South Korea, Taiwan and so on. PAL is adopted by China, Denmark, Finland, Germany, Hong Kong, Iceland, India, Indonesia, Ireland, Israel, Italy, , Malaysia, Norway, Pakistan, Singapore, South Africa, Sweden, Switzerland, Thailand, Turkey, United Kingdom, etc. PAL is the most widely used TV standard.
The difference of TV standard means that you can't play PAL DVD movies in countries that use NTSC TV standard, and vice versa.Quality Difference between NTSC and PAL
Although PAL uses a lower fewer frames rate than NTSC (25fps vs 30fps), it has more lines than NTSC (625 vs 525). More lines contains more visual information, which generate better picture quality. That's also why black bars would be added to compensate for the smaller resolution when you try to convert NTSC videos to PAL videos.
-
21. What is an IFO file?
IFO, short for Information, is a DVD file that contains information about DVD chapters, audio tracks and subtitles.
IFO information is a video title set (VTS). When the DVD disc is recognized by a DVD-ROM, usually AUDIO_TS (audio title set) and VIDEO_TS (video title set) folders will be displayed.
IFO files are one of three types of files that exist on a DVD disc. It includes important navigational information, like where a video chapter begins, and where audio and subtitle streams start within the movie (VOB) file. IFO files are not encrypted.
How to convert an IFO file by DVD converter tools
Double click an IFO file, and the VIDEO_TS folder is there. Simply drag and drop the VIDEO_TS folder to the application to get started.
-
22. How do you remove lines in fast moving scenes of videos?
Follow these steps to remove fast moving lines that appear on the output video:
1) Start the application and load video files into it.
2) Click the Play button to preview your video files to see whether they play well.
3) Click the Edit button to open the Video Edit window.

4) In the Effect tab, find the Deinterlace option and open the Deinterlace dropdown list. Choose any option except None to see whether the problem is still there.

If this doesn't work, contact our customer service team with detailed description of your problem.
-
23. How do you add a watermark to a video?
After a video file is added to the program, click the Edit button to open the Video Edit window.
In the Video Edit window, go to Watermark tab and click the Check box before Enable, and then you can add an image watermark or text watermark as below:
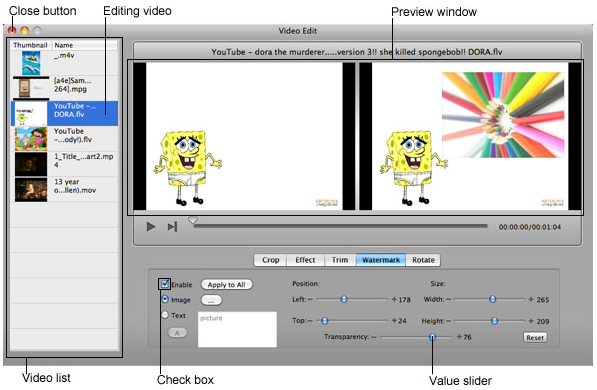
1) To add an image watermark, select Image and choose an image from your computer.
2) To add a text watermark, select Text and type words in text filed. Click the A button to make settings to font, color, etc.
3) To adjust watermark's transparency, position and size, simply drag the Value Sliders and you'll see change in the preview window.
4) If you don't want a watermark, simply uncheck the Check box.Note: Once the video is converted with a watermark, the watermark cannot be deleted. You have to convert the video again.
If you want to cancel all change, click Reset. If all settings are done, click the Close button to save the changes.
