PDF Converter Editor (PDF Element) FAQs
-
1. How do I highlight text in the PDF file?
To highlight text or add other markups to the PDF file, please follow the instructions below:
1. Open the PDF file in the software; click the Markup icon on the upper right corner of the Tool bar. You will see the different markup options such as Highlight, Underline and Strikethrough.

2. After selecting a markup tool, a check mark will appear next to it.
3. Choose a color and drag the cursor over the text in the PDF. -
2. How do I remove the watermark added to my files in the trial version?
The watermark that you see on your file is one of the limitations of our trial version. After you have purchased and registered the software, unlocking the full version, reload the PDF file and the software will remove the watermark automatically. Now just click on File>Save to re-save the file without the watermark.
If the watermark is on your converted word or excel file, reload the PDF file again into the registered version and convert it again, and the output fill will not have a watermark on it.
-
3. What are the limitations of the trial version of PDFelement?
The trial version PDF Editor and registered version are functionally the same product, except the trial version has the following limitations:
1. The trial version will add a watermark to the PDF file when you edit and save the PDF file in the trial version.
2. When converting the PDF file to other formats, such as Word, Excel, etc., it will leave a watermark on the converted file and the trial version will only convert 5 pages of the original PDF file. If the original PDF file is less than 5 pages, it will only convert half of the pages in the PDF file.After you have purchased and registered the software, unlocking the full version, reload the PDF file and the software will remove the watermark automatically. Now just click on File>Save to re-save the file without the watermark.
If the watermark is on your converted word or excel file, reload the PDF file again into the registered version and convert it again, and the output fill will not have a watermark on it.
-
4. How to open the sidebar?
Click View>Sidebar from the top menu to open the sidebar.

Alternately, you can click on the Sidebar icon
 to choose the display option.

-
5. How to add a hyperlink to PDF file?
To add a hyper link to a PDF, follow steps below:
1. Click the Hyperlink icon

2. The cursor will change to a crosshair symbol.
3. Drag the cursor to select an area to insert the hyperlink.
4. A pop up window will appear for you to set the link.There are two options:
a. Go to page: You can direct the link to another location in the same file.
b. Open a webpage: enter the URL (web address) of a website.

5. Click Ok to save the changes.
-
6. How do I tell the different between a normal PDF and a scanned PDF?
When you import a PDF into PDFelement, if you are able to select and edit the text, then you are working with a normal PDF. If you are unable to select and edit, then you have a scanned document that will require you to Perform OCR.
-
7. What's OCR (Optical Character Recognition)?
OCR is short for Optical Character Recognition. It is a technology to extract text from scanned PDF or image PDF files. It enables the user to edit, copy and search the text of the scanned PDF/ image PDF document.
To learn more about the OCR function, please click: http://www.wondershare.com/pdf-converter/ocr.html
-
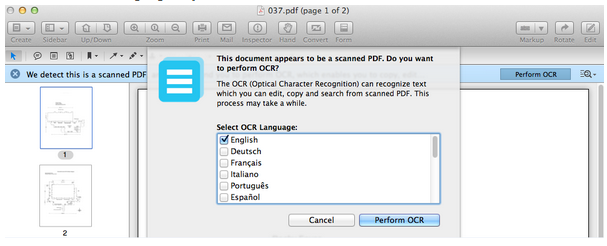
8. Why do I have to select the language when I convert a scanned PDF?
Due to the different languages and characters used, it is important to specify the language that you will need the scanned document to be read in, so that it will recognize those special characters.
If you do not choose the correct language, then the OCR plugin will not recognize the content of your file successfully and will result in an incorrect conversion.
-
9. How to edit a scanned PDF file?
1. After loading the scanned PDF file in the application, a notice will appear to ask you to perform OCR.

2. Install OCR

3. Perform OCR function to edit the scanned PDF file.
4. Choose correct language of your PDF file.
5. Click on the Edit button to edit the text of the PDF file.
-
10. What to do if downloading the OCR fails?
Re-install the application by dragging it to the trash and emptying it. Download and install the application from the link below.
Download URL: http://download.wondershare.com/mac-pdfelement_full841.dmg
When re-installing the software, make sure to drag the application’s icon out of the pack and into the Application folder during the installation process.
Load the scanned PDF file again into the software and try to download the OCR again.
-
11. How do you add stamps?
1. Click the Stamp icon.
2. Choose one of the options presented.

3. Under the “More” option, there are more stamp options or customize your own stamps.

Type a new stamp: enables you to use the keyboard to type the words that you want for the new stamp.
Draw a new stamp: enables you to use the mouse click to draw a picture or drag some text to be on the new stamp.
Create stamp from captured picture: enables you to use the camera on your Mac to take a picture, and then use this picture as a new stamp.
Create stamp from image file: enables you to use the existing pictures on your Mac as the new stamp. -
12. How do you open and view the Hyperlink in the PDF file?
Click on the hand icon and move the mouse to the Hyperlink. The mouse will appear as a pointing hand icon. Continue to hover the cursor over the link and URL will appear. It will direct you to the webpage when you click it.

-
13. How to convert PDF to other formats (Word, Excel, PowerPoint, Text, EPUB, HTML)?
1. Click the “Convert” icon to open the Convert window.

2. Click the W button on the top-right corner of the window to choose an output format.
3. Click “All Pages” button to choose the page numbers that you want to convert.
4. Click “Settings” button (gear icon) on the bottom-left corner of the window to get settings of different output formats. -
14. How do I open EPUB files on my computer or mobile devices?
You can download and install one of the EPUB Reader tools from below. After you have installed it you can open up EPUB files.
1) Adobe® Digital Editions (Windows and Mac OS)
Download link: http://www.adobe.com/products/digital-editions.html?promoid=DTEIO2) Sony Reader Library(Windows and Mac OS)
Download link: https://ebookstore.sony.com/download/3) Calibre (Windows and Mac OS)
Download link: http://calibre-ebook.com/download4) Stanza (Windows OS)
Download link: http://stanza-desktop.en.softonic.com/Use the following tools to view EPUB files on Mobile Devices:
1) iPad: iBooks,Stanza
2) iPhone: iBooks, Stanza
3) Andriod Devices: FBReaderJ
Download link: http://fbreader.org/FBReaderJ -
15. How to add a bookmark to a PDF file?
Bookmarks allow you to go back to specified pages quickly and easily.
To add a bookmark to your file, click on the Bookmark button .
You can find your bookmarks listed in the sidebar.

-
16. How do you insert an image to the PDF?
1. Click the Edit icon on the upper-right corner of the window. The editing tools will be displayed below.

2. Click the Add image icon, then a window will appear to let you choose an image. The image will be added to the current page.
3. Drag the image’s frame to re-size it.
4. Drag the image to re-position it. -
17. How do you add and display the content of the annotation?
To do annotations, go to the selection area.

• The Sticky Note icon ,is for adding notes.
• The Arrow icon is for adding shapes such as arrows, lines, rectangles, ovals, etc.
• The Pencil icon is for marking your file.• The Text box icon is for adding text boxes.
To display the content of the annotations:1. Right-click on the sticky note icon that was added to the PDF file.
2. Click “Show Popup Note” to view the content.
-
18. How do you set a password for the PDF?
Open the PDF file and click File> Security on the top menu bar.

Go to Security> Show Security Properties or Security Settings. Security Properties will enable you to know all the permissions of the current file. Security Settings will enable you to set an Open Password or Permission Password for the file.

After setting a password, click OK. The application will remind you to save a new copy of the PDF file.
Click Save As… then the password will be activated on the saved file.
-
19. How do you expand and collapse Bookmarks?
For a single Bookmark, select and right-click on the bookmark and choose “Expand”. To Collapse, select “Collapse”.

For all Bookmarks, click the “gear” icon
 at the bottom right of the page. Select “Expand Bookmarks” from the dropdown list.

-
20. How do you customize the toolbar?
Right-click on the blank space on the toolbar. Choose “Customize Toolbar” from the list.

Drag and drop your most used function buttons to the toolbar. There is also a default set that can be dragged to the toolbar.

-
21. How to do you specify the document information?
The document information consists of Title, Author, Subject and Keywords. To view or change this information, go to the Inspector icon in the Toolbar.

-
22. How do you edit text?
To edit, delete or modify the text in the PDF, follow the steps below.
1. Select the text to be modified.
2. Click the Edit button on the upper right corner of the toolbar. The format bar will appear as shown below.
3. In the text-editing mode, you can add, delete or modify the text.
4. In the format bar, there are options to format the text and change font.
5. Click anywhere outside the selected text to save the changes.

-
23. How to do you jump to another page in the PDF file?
On the top menu bar, click View> Go to. You can then select from one of the options presented.

-
24. What factors can cause a converted file to be output with poor quality?
PDFelement can recognize and convert normal PDF files. The software works best with text-only files; however it can work well with images. If you end up with quality issues, the following could be the causes.
1) The original PDF files are too complex and contain many elements such as pictures, graphs, etc.
2) The original PDF files are blurry.
3) The color of the text is too similar to the background of the original PDF files.We would suggest trying differently formatted PDF’s to see how they work when converting. Our development team is constantly working to improve the quality of the output files, and will release new updates and versions periodically.
