Ultimate Media Converter for Mac FAQs
-
1. How do you reduce the file size of the video?
The size of the file depends on a few factors such as bit rate, frame rate, codec and resolution. To reduce the file size, you can go to the Settings on the top right corner of each format selection. From there, you can change the settings such as decreasing the bit rate.
Follow the following link to find the Settings button.
http://support.wondershare.com/how-tos/how-to-set-output-video-audio-parameters.htmlPlease note that this might affect the output quality. The default settings are usually the best.
-
2. What should I do if the software prompts, “Loading incomplete. 1 file failed to load; the failed file is...”?
Please follow the trouble-shooting steps below if you received this loading error:
1) Make sure that the software and the Mac can support the file format. For the list of supported formats, refer to the following link.
http://www.wondershare.com/mac-video-converter-ultimate/reference.html.
2) Check if the video file plays properly in QuickTime Player or VLC Player. If so, follow the instructions below to re-code the file before loading it in the software again.
QuickTime Player: Keep original file playing in QuickTime Player. Go to File> Export from the top menu. Select output format in the Format drop down list.
VLC Player: Launch VLC then go to File> Streaming/Exporting Wizard from the top menu. Next, go to Transcode/ Save to File and follow the prompts to re-code the file.If the problem persists, please contact us and send us your video information such as format type and what format you are converting it to. You can also send us a copy of your video for testing.
-
3. What should I do if the video and audio of the converted file are out of sync?
Before loading the file into the software, make sure the file plays properly and are in sync’d on the Mac. Then select an output format and go to its settings. Lower the frame rate and convert it again. If the problem still persists, please contact us with the original file for further assistance.
-
4. How do I speed up conversion?
Here are some tips to speed up conversion:
1. Set the bitrate and resolution lower to help increase the conversion speed.
Tips: To learn how to set parameters, please refer to the link below:
http://support.wondershare.com/how-tos/how-to-set-output-video-audio-parameters.html2. For converting DVDs, you can speed up the conversion by loading the main movie then going to iMedia Converter Deluxe > Preferences from the top menu.
Under the Convert tab, Go to “Load Contents in DVD” and select “Main Movie Only” from the drop down menu.There are several factors that affect the conversion speed.
1. If there are other applications running at the same time during conversion, it is occupying too much of the CPU’s resources resulting to slower conversion speed.
2. For DVDs, it is possible that your DVD drive’s speed may not be functioning optimally.
3. The hardware configuration of your Mac may not be sufficient to handle the type of conversion.
-
5. What should I do if the software prompts me that there is not enough space while copying a DVD?
There are two parts in the whole copying process.
The first part is copying the original DVD file to an ISO file on the Mac HD.
The second part is burning the ISO file to the blank Disc.The ISO file is usually two times larger than original DVD. There must be enough space (at least twice the size of original DVD) on the Mac HD for saving the ISO file. You can transfer or clean up some files on your Mac to make room.
-
6. What to do if the burned DVD doesn't play on the DVD Player?
Please follow these trouble-shooting steps:
1. Make sure that the correct TV standard is selected properly. Click iMedia Converter Deluxe > Preferences in the top menu bar. Under the Burn tab, you can choose between NTSC or PAL in Video mode.
2. Check the specifications of your DVD player to make sure your blank disc and selected format are supported by your DVD player.If the problem still persists, please follow these next steps:
1. Select ISO File in “Burn to” or “Copy to” option. This will copy your original file to the hard drive first.
2. Burn the ISO file to DVD by using the Disk Utility built-in the Mac OS.
3. Go to Images > Burn from the top menu bar, add the ISO file to disk utility and insert a blank DVD disc.If the trouble-shooting steps above do not help, please contact us with the following important information for further assistance:
1. Information of your DVD player (Brand, model, year)
2. The brand and model of your blank DVD disc.
3. The OS version of your Mac
4. Whether your burned DVD can be played on your Mac. -
7. How do you load all episodes from the DVD?
Test the DVD on the computer. If it plays properly, launch the software and click “iMedia Converter Deluxe” on the top bar menu and go to “Preferences”. Under the Convert tab, go to Load Contents in a DVD and select All Titles from the dropdown list. Then load the DVD and try again.
If the instruction above does not work, try testing more DVDs to narrow down the cause of the error. It can be a certain DVD with a special protection codec in it or if the error occurs on all your DVDs.
In this case, please contact us with the information of the DVD such as title, region code, purchasing link from Amazon (if applicable) for us to test.
-
8. What should I do if the software fails to load a video files?
If the product fails to load a video file:
1. Ensure that the software is installed properly. After opening the .dmg file, drag the application icon out and drop it to your Applications folder.
2. Please check if the software supports the format of your video. Refer to the link below for the list of supported formats.
http://www.wondershare.com/mac-video-converter-ultimate/reference.html
4. Check if the video file plays properly on the Mac. If the original file doesn't play normally on the Mac, the software will not convert it properly.
5. Check if the video file plays properly in QuickTime Player or VLC Player. If so, follow the instructions below to re-code the file before loading it in the software again.
QuickTime Player: Keep original file playing in QuickTime Player. Go to File> Export from the top menu. Select output format in the Format drop down list.
VLC Player: Launch VLC then go to File> Streaming/Exporting Wizard from the top menu. Next, go to Transcode/ Save to File and follow the prompts to re-code the file.
If the instructions above did not help, please contact us with the file for further assistance.
-
9. How do you stream video to the TV?

Click “Add” to add files or a folder. The loaded files can be sorted by name, date, type and length.

A stream button and device list will appear when you hover your cursor over a video. Select the device to stream the video.
Click the Stream button to switch devices or play the video locally.
-
10. Why is the transfer speed too slow?
The wireless speed is reliant of your router’s performance. You may need to find more information on your router on how to modify wireless settings to improve the speed. You can contact your router’s support if you need further help with this.
We are regularly improving the transfer speed in new software updates.
-
11. Why does my phone fail to connect when scanning a QR code?
Please check that the phone and computer are connected to the same LAN. Both need to connect to the same router, either though a LAN port or wireless connection.
-
12. How do you change the location of the output folder?
The output folder is located near the bottom of the window. You can click on the output dropdown menu to select most common folders or click on the folder icon next to it to select your output location.

-
13. How to transfer videos from camcorders directly to the software?
Follow instructions below on how to load videos from a camcorder.
1. Connect your camcorder to the computer and launch the application. The software will read the files on your camcorder.

2. If you decide to close the window, you can alternately open it from the main interface.

3. Select the videos to be converted. To convert all videos, tick “Select All” then click “Load”.
-
14. How to burn DVD in iMedia Converter Deluxe for Mac.
Click Burn tab, after you select Burn in Copy/Burn selector, you enter the interface as below.

1) Load videos
Drag directly, or click Add button or Show Media browser to load video files from local disk. You can select subtitle(load subtitle file) and audio track from the drop down list of Audio track switch and Subtitle Selector.
Note: DVD and audio files are not supported.
2) Edit files (optional)
You can edit the imported files before burning to a DVD. Click the Edit button, you can trim, crop, add effect, add watermark and adjust loaded subtitle.
3) Output settings
Type text in the Name box to name the new DVD. There are four output types for you to choose in Burn to box: SuperDrive, DVD Folder, .dvdmedia, and ISO File. If you choose DVD Folder, .dvdmedia, or ISO File, you can choose folder location to save your DVD file in Destination box.
On the bottom of the main interface, you can choose several types of DVD Menu. Select the Aspect Ratio of your DVD: 16:9 or 4:3. You can also choose the Quality: Good, Better or Best. Click the drop down list of Select blank DVD type to select the output DVD type: DVD(D5) or DVD DL(D9).
Click the Preview button to preview your DVD. If you complete the settings, click the Burn button.
Tip: Click iMedia Converter Deluxe > Preferences on the top menu bar. In the Burn tab, you can choose the Video Mode: NTSC or PAL, Burn Speed and Play movies in sequences without returning to the main DVD menu. -
15. How to copy DVD in iMedia Converter Deluxe for Mac.
Please refer to the link below.
User Guide: How to Burn or Copy DVDs
http://www.wondershare.com/mac-video-converter-ultimate/guide.html#tab_03Note: The product supports copying D9 to D9, D5 to D5, D5 to D9. You cannot compress a D9 to a D5.
Click the Copy button. The application will start copying the DVD. While it’s copying, the original DVD will be ejected and the application will prompt you insert a blank DVD.
-
16. How do I rip commercial DVD with CSS Encryption?
Most commercial DVDs are protected with Content Scramble System (CSS). This is to prevent them from being illegally copied. CSS is a Digital Right Management (DRM) and encryption system, utilizing a proprietary 40-bit stream cipher algorithm.
iMedia Converter Deluxe is able to convert videos and rip most DVDs except Commercial DVDs. However, you can try third-party softwares like the Free DVD Protection Removal Plugin provided here. It can help enable the software to rip both common and commercial DVD movies.
http://www.protectdvd.com/
-
17. How to rip DVDs created by a DVD recorder?
The DVD created by a DVD Recorder falls under homemade DVDs category. The structure of a homemade DVD is typically different from a commercial one.
Copy the files from the DVD to your local hard drive and then convert single VOB files.
-
18. How to convert an iMovie project file?
iMedia Converter Deluxe doesn’t support loading iMovie projects directly. You will need to export it first from iMovie before loading it to the application.
1. Launch iMovie. Go to the Share icon> File.
2. iMovie would typically export the video to a MOV file.
3. You can now load the exported file to the iMedia Converter Deluxe application. -
19. How to capture a snapshot?
Load the file to the software. Click the Edit button to the right of the video file thumbnail.

Click on the Camera icon near the bottom of the window . This will capture a snapshot of the video playing in the preview window.
Note: You can select Open Snapshot Folder and Set Snapshot Folder from the drop down list.
-
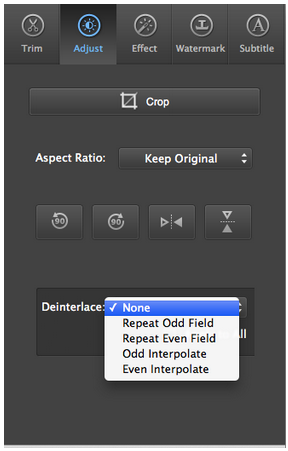
20. What to do if there are lines in the video?
Here are some trouble-shooting tips to follow:
1. Check if the video file plays properly. Load the file to the software.
2. Click on the Edit button.
3. Under Adjust, go to Deinterlace and select any of the options from the list except “None”.
-
21. How to verify your output file size before conversion?
After loading the video file and selecting an output format, you can check the output file size under the Target information. See screenshot below.

Note: The output file size is only an estimation.
-
22. Why does the product fail to load iTunes files?
If the iTunes files are M4V format with DRM protection, the software will not be able to load the file. This is a limitation placed by Apple to limit the chances of piracy.
-
23. What are the differences between NTSC and PAL?
North American DVD players are typically formatted to play NTSC video. PAL is the standard in most of Western and Central Europe. The difference is not the encoding of the video, but the means in which the video is transmitted.
PAL (Phase Alternating Line) video is the result of the European electrical grid, which is 50 hertz alternating current (Hz AC). Power circuits in North America are 60 Hz AC, which provides electricity at a higher frequency that is incompatible with PAL video. Because a new system needed to be designed, engineers tried to create a system that addressed deficiencies with the American video protocol. They called it National Television System Committee (NTSC).
For more information on the specifics of NTSC and PAL, please see link below.
http://www.diffen.com/difference/NTSC_vs_PAL -
24. How do you set custom video and audio format?
Click the settings button (the gear icon) on the top right corner of each output format. A pop-up window will appear for you to set your own parameters. Please note that the default setting is usually recommended for the particular format.

To create a custom format, click “Create Custom” button on the bottom of the window. Name the customized format; you can re-use this format settings later.

-
25. How do you keep DVD chapter markers?
Go to iMedia Converter Deluxe on the top menu bar, and then go to Preferences. Choose “Keep DVD Chapter Markers” under the Convert tab. Load the DVD files.
Currently, only formats for Apple devices will retain chapter markers. Go to the Devices tab near the bottom of the window and select an Apple device (ie. iPhone, iPad, iPod, etc).
-
26. How to convert NTSC to PAL?
The software cannot switch between NTSC and PAL automatically. You will need to manually change the resolution and frame rate.
Please change the output settings as follows:
NTSC:
Resolution: 720 x 480
Frame Rate: 29.97fpsPAL:
Resolution: 720 x 576
Frame Rate: 25fps -
27. How to upload videos to YouTube from iMovie (iMovie 11 included)?
Please refer to the link below.
https://support.apple.com/kb/PH2279?viewlocale=en_US&locale=en_USFor general iMovie questions, please follow the link below:
https://www.apple.com/support/mac-apps/imovie/ -
28. What to do when you encounter "Logical block address out of range" error?
If you encounter “Logical block address out of range” error when copying or burning a DVD, let your optical drive rest for a while. This is usually caused by an overworked optical drive.
In case the problem persists, please contact us with the following information.
1. The DVD information such as title, region code, purchasing link from Amazon (if applicable)
2. Does the error occur on other DVDs?
3. The type of DVD Drive, internal or external.
4. The brand of blank disc. -
29. How to add subtitle file?
1. Click on the Edit button on the right side of the file thumbnail.

2. Go to the Subtitle tab.
3. Select “Load subtitle” in the choices under Subtitle.
4. Import a subtitle file.
Note: The program supports SRT/ASS/SSA subtitle files only.To define the attributes such as font and color of the subtitle, go to “Font”
To choose your own text encoding, go to “Encoding”.
To adjust the position of the subtitle, use the slider under “Position”.Tip: To add the subtitle on the video automatically, make sure that the video file and subtitle file are in the same folder and with the same name.
-
30. Why is there a subtitle even if I have chosen "None" or "No subtitle"?
There are three kinds of subtitles: built-in, external and fake subtitles.
1. Built-in subtitles are a part of the DVD. They are separated from video files
It is set in the software as a built-in subtitle.2. External subtitles are not included in the DVD. Generally, they exist independently as SRT files.
3. The fake subtitles are actually not subtitles, but a part of the video files. They are the same as image components in videos and they can't be removed unless you crop the portion of video where they are displayed.
If you chose None or No Subtitle but the text in the video remains, it means that it is most likely a “Fake subtitle”.
