Video Editor User Guide
-
1. How to archive a project file?
Archiving your project ensures you have all your necessary files together so that you are able to open the project file without any trouble.
1. Select File from the top menu and select “Archive Project” to archive the project file.
2. Give the project a name and select the target location for your file then click Save. -
2. How to set face off.
To set the face off, please follow the steps below:
1. Drag your video clip to the timeline.
2. Click on the Power tool in the tool bar . Alternately, you can also right-click o the video clip and select “Power Tool” from the dropdown menu.
3. Select the Face Off tab and enable “Apply Face Off to the clip”.
4. Choose a face from the list then click OK to save the Face Off effect.
-
3. How to set mosaic.
1. Drag your video clip to the timeline.
2. Click on the Power tool in the tool bar . Alternately, you can also right-click o the video clip and select “Power Tool” from the dropdown menu3. Select the Mosaic tab and enable “Apply Mosaic to the clip”.
4. Move the slider to change mosaic effect percentage.
5. Click OK to save the mosaic setting.
-
4. How to set tilt-shift.
1. Drag your video clip to the timeline.
2. Click on the Power tool in the tool bar . Alternately, you can also right-click o the video clip and select “Power Tool” from the dropdown menu.3. Select the Tilt-Shift tab and enable “Apply Tilt-Shift to the clip”.
4. By moving the parallel lines and the circle, you can select the part which will remain clear and other part will blurred.
5. Click OK to save the Tilt-Shift setting.
-
5. How to do an audio recoding?
1. Click the Voice Over button from the toolbar.

2. A pop up window will appear. Click on the red record button. It will count down to let you know when to start voice recording. Click the red record button again to stop.
3. You also have the option to choose another device for recording.
4. Click the OK button when done.
5. The audio recording will be added to the Library and the timeline.
-
6. How do you use Video Recording feature?
1. There are two ways to record a video using the software.
a. Click File > Video Recording. This is located in the top menu.
b. Select the Video Recording button above the timeline

2. A video recording window will pop-up and activate your web camera.
3. Click the red Record button to start recording and click it again to stop. You can select a different video and audio device by selecting from the drop down menu.
4. Click on the OK button when you are finished recording. The recorded video will be added directly to the Library. You can then drag it to the Timeline to edit it further.

-
7. How to import and move files sequentially?
It is good practise to name your files sequentially (example: picture01, picture02, picture03). When you drag the files to your library, it will be arranged in order.
To do multiple selection, hold down Command + mouse click or Shift + mouse Click.
You can do a multiple selection with the method above and drag it to the timeline.
-
8. How to set the duration for the pictures?
Select an image on your timeline. Hover your mouse over the edge of your image and drag the edge to the left or right to change the duration of the image.
Alternately, you can double-click on the image in your timeline. A pop up window will appear and you can change the duration from there and apply to all images.

-
9. How to use the Green Screen feature?
Drag your green screen image to the PIP layer in the Timeline. There are two different ways to find the Green Screen function.
1. Right click the image from timeline and select “Green Screen” or “Show Inspector”. Select “Green Screen” at the left side of the pop-up window.

2. Click the Inspector button from the toolbar. Proceed by going to Green Screen on the left tab of the pop-up window.

-
10. How do you rotate and enhance your video clips?
Now that you have your video clips in your timeline, you can enhance or add some effects to them. Here’s how:
1. Select a video clip in the timeline.
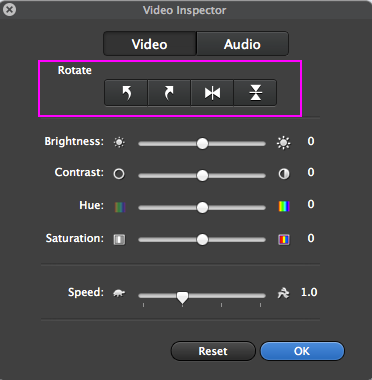
2. Click on the Inspector icon in the toolbar or right-click on the video clip and select “Show Inspector”.3. A pop-up window will appear which will give you options for Brightness, Contrast, Hue, Saturation, Auto denoise and enhance. You can also change the speed of the video clip and rotate it as well.
Note: You can change video playback Speed by dragging the slider. There are four levels: 0.2, 0.25, 0.33, 0.5, 1.0, 2.0, 3.0, 4.0, and 5.0 times of the original speed. Click the OK button to save the changes or click the Reset button to remove all the settings. -
11. How do you add texts to the videos?
p>To apply the text to the video, please refer to below steps:1. Click the Title button located at the left side of the Library. Then drag a title template to the timeline.
2. To edit the title text, double-click on the title template in the timeline to open the title inspector. Type your text in the text box and select your preferred font properties (ie. Font, size, alignment, etc.).

Tip: You can drag the title to any position in Title track and adjust the duration by dragging the end handles of the clip. -
12. How do you edit and add effects to your audio?
After dragging your audio to audio track of the Timeline, you could follow below ways to change the audio effect.
1. Select an audio clip from your timeline.
2. Click on the Inspector icon in the toolbar or right-click on the audio clip and select “Show Inspector”.
3. A pop-up window will appear which will give you options for Pitch, Fade in and out, Volume and Speed.4. Click the OK button to save the changes or click the Reset button to remove all the settings.
-
13. How to delete the transaction?
Please click the thumbnail of the transaction icon, at the same time, press delete key on your keyboard. In this way, you can remove it.
-
14. How do you use and customize your PIP?
After dragging your picture to the PIP track in the Timeline, you could follow below steps to set the PIP.
1. Please click the Inspector button in toolbar. Alternately, you can right-click the video in timeline and select “Show Inspector”.

2. From the PIP Inspector window, you can select Motion, Mask or Green Screen options.
-
15. How do you trim video and audio clips?
There are two methods for you to trim a video or audio:
Method 1: Move the red indicator in the timeline to where you want the clip to be trimmed. Right-click on the video clip and select “Trim Playhead”.
Method 2: Select your video clip and then hover your cursor over the edge of the video clip in the timeline. You can then drag the edge of the clip left or right to trim the clip.
-
16. How to change audio effect?
Point to the audio you want to change audio effect, you will see the Edit Options button. Click it to expand the editing options and select Audio Effect from the list. Or you can click the Edit button to open the Audio tab.
Drag the slider to adjust the Volume. You can add Fade in and Fade out effects by dragging the sliders to adjust the time.
Click the Reset button to remove all the settings. -
17. How to trim audios?
Point to the audio you want to trim, you will see the Edit Options button and click it to expand the editing options. Or you can click the Trimming button under the Preview Window.

A pair of marks has been added to the audio. Drag to divide the two sliders and the part between the two is what you want. You can trim only one part of the audio.
Click the Time button, a window pops up for typing digits in Start Time and End Time to define the exact time. Click the Remove button or choose the current two marks and press Delete key to reset. Click the Done button to save the settings.
Click the Preview button to play the trimmed parts of the video and click the Reset button to reset. After you finish edits, click the Done button to save the settings and take the effect. -
18. How to change video effect of the videos?
After you load the video into the program, point to the video you want to change video effect, you will see the Edit Options button. Click it to expand the editing options and select Video Effect from the list. Or you can click the Edit button and then click the Video tab.
Drag the sliders of Brightness, Contrast and Saturations, or select an option from Deinterlace drop down list to adjust the video effect.
In the Preview Window, you can preview the effect timely. Click the Apply to all button to apply the effects to all videos or click the Reset button to remove all the settings. -
19. How to add filter effect to the videos?
After you load the video into the program, point to the video you want to add filter, you will see the Edit Options button. Click it to expand the editing options and select Filter from the list. Or you can click the Edit button and then click the Filter tab.

Click one of the filter effects, you will see A Pair of Marks is added to the beginning of the video. The default length is 5 seconds. In the Preview Window, you can preview the effect timely.
You can add filters to different parts of the video. Drag the Play slider out of the current part, and then select another title effect from the list. Another pair of sliders will be added.
Note: If you drag the Play Slider to the part with filter, it will be replaced with new filter.
Click the Time button, a window pops up for typing digits in Start Time and End Time to define the exact time. Click the Remove button or choose the current two marks and press Delete key to remove the two marks. Click the Done button to save the settings.
Right-click one filter effect from the list and select Add to Favorite. The filter effect will be stamped a yellow star icon. Select the check box of Favorite to check the favorite title effects. You can select Remove from Favorite to remove it from the favorite list. -
20. How to add title to the videos?
After you load the video into the program, point to the video you want to add title, you will see the Edit Options button. Click it to expand the editing options and select Title from the list. Or you can click the Edit button and then click the Title tab.

Click one of the title effects, you will see A Pair of Marks is added to the beginning of the video. The default length is 5 seconds. Drag to divide the two marks and the part between the two is what you want to add title.
In the Preview Window, you can type text in the text field as shown there. Drag the text directly to move its position on the video.
In the Font tab, you can adjust the text properties such as bold, italic and so on.
You can add titles to different parts of the video. Drag the Play slider out of the current part, and then select another title effect from the list. Another pair of marks will be added.
Note: If you drag the Play Slider to the part with title, it will be replaced with new title.
Click the Time button, a window pops up for typing digits in Start Time and End Time to define the exact time. Click the Remove button or choose the current two marks and press Delete to remove the two marks. Click the Done button to save the settings.
Right-click one title effect from the list and select Add to Favorite. The title effect will be stamped a yellow star icon. Select the check box of Favorite to check the favorite title effects. You can select Remove from Favorite to remove it from the favorite list. -
21. How to crop videos?
After you load the video into the program, point to the video you want to crop, you will see the Edit Options button. Click it to expand the editing options and select Cropping from the list. Or you can click the Cropping button below the Preview Window.

There are two options: 16:9 or Manually.
If you select 16:9, the application has set the aspect ratio for you. You can drag the four boxes to adjust the size.
If you select Manually, you can set the aspect ratio manually. Drag the four boxes to adjust the rectangle, and the part out of the rectangle is to be eliminated.
Click the Reset button to remove all the settings. Click the Done button to save the settings and take the effect. -
22. How to trim videos?
After you load the video into the program, point to the video you want to trim, you will see the Edit Options button. Click it to expand the editing options and select Trimming from the list. Or you can click the Trimming button below the Preview Window.

Click the Add Mark button to add A Pair of Marks. Drag to divide the two marks and the part between the two is what you want.
This application supports multiple-trimming, so you can trim several parts from one video at one time. Drag the Play slider and then click the Add Mark button to add more trimming marks and define the part you want.
Select one trimmed part, and then you will see the Time button. A window pops up for typing digits in Start Time and End Time to define the exact time. Click the Remove button or choose the current two marks and press Delete key to remove the two marks.
Click the Preview button to play the trimmed parts of the video and click the Reset button to remove the trimmed part. After you finish edits, click the Done button to save the settings and take the effect. -
23. How to record videos?
Click File> Video Recording from the top menu, you will get a similar window as below.

Click the Record button to start recording and click it again to stop recording.
Click the Play button to preview the record. Click the Stop Play button to stop playing.
If you have other external devices except iSight, you can expand the drop down list of Device option to select devices for recording.
Choose the resolution of the record from the drop down list of Resolution option.
You can select Line In, Internal Microphone or other audio devices available on your Mac in the Device option of Audio when recording audios.
The record folder can be seen in the Positions option.
You can change the output folder of your record by the following steps.
Click the … button, in the pop up window, locate the folder you want, and then click the Open button. The folder will be changed.
Click the Done button to close the tab. -
24. How do you change the output quality?
The output video quality depends on many factors, such as source file, computer configuration, and the output parameters you set. There are different output settings resulting to different results.
For most common video formats
1. Export your video project by clicking on the Export button then go to the Formats tab near the top.
2. Choose the format you need. (ie. MOV, MP4, M4V, AVI, FLV, etc.)3. You can choose a higher resolution by clicking on the dropdown menu under “Resolution”.
4. You can then select “Config” to set video and audio parameters.
5. To choose a Custom resolution, manually input the desired resolution.
For Devices1. Export your video project by clicking on the Export button then go to the Devices tab near the top.
2. Choose your device from the choices presented below.3. You can select “Config” to set video and audio parameters.
For DVDs
1. Export your video project by clicking on the Export button then go to the DVD tab near the top.
2. Under Quality, please set it to Good.
3. Make sure there is enough space in your disc for your video.
4. Adjust other parameters to fit according to your DVD player’s requirements (ie. TV Standard, aspect ratio, etc.).If above do not work, click this link http://dropcanvas.com/ to upload the project file, then contact us with the share link when you finished.
-
25. How do you remove or replace the audio of a video file?
If you want to remove or replace the audio of the video file, please follow these steps:
1. Click “Add Media” to import video and audio files to the library first or simply click on the + button.
2. Drag and drop the video from the Library to the timeline.
3. Right click the video clip and select Audio Detach in the option menu.
4. Select the audio track and remove it by clicking the Delete button or right-clicking and select Delete in the option menu.
5. To replace the audio, drag and drop the new audio file from the Library to the audio track in the timeline. You can now edit or move the audio clip anywhere in timeline.
6. You can continue to edit your video project. Once you are done with your video, export the project by clicking on the Export button.
-
26. How to apply and customize transitions?
You can add transitions between clips in the timeline. This helps transition from one photo or video clip to the next.
1. The transition icon can be located on the left panel of the software. When you click on the transition icon, it will display the list of transitions to choose from. Drag a transition from the Library into your timeline in between clips.
2. To apply the same transition between all clips in the timeline, right-click on the transition thumbnail from the library and select “Apply to all”.
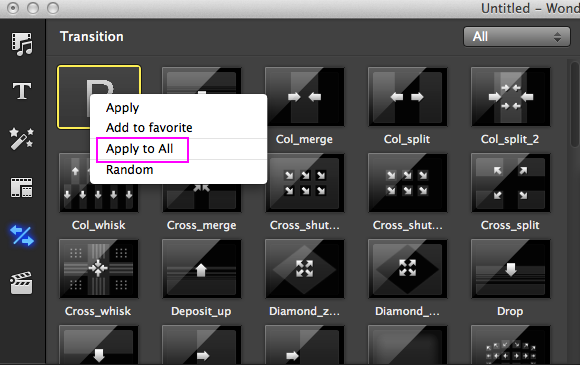
3. You can customize your transitions by double-clicking on the transition in the timeline. It will show the transition properties; from there you can determine the transition duration, change transition or apply to all other transitions.
-
27. How to trim audios?
Point to the audio you want to trim, you will see the Edit Options button and click it to expand the editing options. Or you can click the Trimming button under the Preview Window.
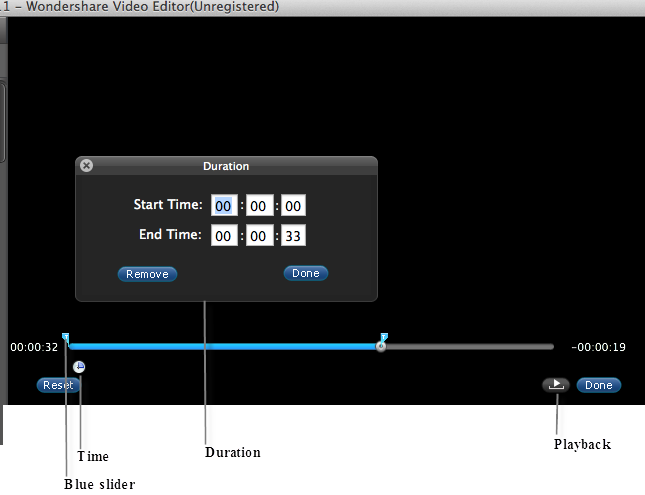
A pair of marks has been added to the audio. Drag to divide the two Blue sliders and the part between the two is what you want. You can trim only one part of the audio.
Click the Time button, a window pops up for typing digits in Start Time and End Time to define the exact time. Click the Done button to save the settings and take the effect.
Click the Preview button to play the trimmed parts of the video and if you want to ree-trim, click the Reset or Remove button to reset. -
28. How to add filter effect to the videos?
After you load the video into the program, point to the video you want to add filter, you will see the Edit Options button. Click it to expand the editing options and select Filter from the list. Or you can click the Edit button and then click the Filter tab.

Click one of the filter effects, you will see Blue slider is added to the beginning of the video. The default length is 5 seconds. In the Preview Window, you can preview the effect timely.
You can add filters to different parts of the video. Drag the Play slider out of the current part, and then select another title effect from the list. Another pair of sliders will be added.
Note: If you drag the Play Slider to the part with filter, it will be replaced with new filter.
Click the Time button, a window pops up for typing digits in Start Time and End Time to define the exact time. Click the Done button to save the settings. Click Remove button to reset or choose the Blue sliders to press Delete key to remove them.
Right-click one filter effect from the list and select Add to Favorite. The filter effect will be stamped a yellow star icon. Select the check box of Show Favorite to check the favorite title effects. You can select Remove from Favorite to remove it from the favorite list.
-
29. How to take a snapshot.
To take a snapshot, please refer to below steps:
1. Click the Snapshot button in preview window, then the image will be added directly to the Library. You can drag it to the Timeline to edit it.
2. You can click Video Editor>Preference from the top menu, there is the option "save snaptshot to", so you can change the location where you want to save the snapshots on the Mac. -
30. How to rotate videos.
You can load videos, audio and image files. Besides, you can use the recording function to load a recorded file. In addition, when you preview the video, you can click Snapshot to load the snapshot image as you After dragging the video to the Timeline, please click the Rotate button in the toolbar, then rotate it accordingly.
Note: There are four options for you to rotate the videos: -90°, +90°, Horizontal Flip, Vertical Flip. You can select the one you want. The effect will display in the preview window.
-
31. How to split a video.
p>Please follow below steps to split the video.1. After dragging your video to the Timeline, please put the Play head to the position where you want to split the video. This is
shown by the red line.
2. Then click the Split button in toolbar directly, the video will be split into two clips.

Note: If you want to split the video to more clips, then put the Playhead to other positions and click the Split button again.
