How to Copy or Rip a DVD on Mac: Free Software & Steps


Modern Macs have no optical drive, yet millions of people still own DVD collections worth preserving. Whether you are archiving family videos, backing up films you already own, or freeing shelf space, copying a DVD on your Mac to a digital file is a practical goal. This guide covers every step: hardware, software selection, copy protection, format choices, and the troubleshooting issues that actually trip people up.
What Hardware You Need Before You Start
Every Mac sold after 2012 lacks a built-in optical drive, so an external drive is the non-negotiable first purchase. USB-A models connect directly to older MacBooks; USB-C models work natively with any Mac from 2016 onward. Bus-powered drives (those drawing power from the USB port rather than a separate adapter) are convenient, but hands-on testing shows they occasionally fail mid-rip on discs with heavy read errors, because the drive demands more current than a single port supplies.

Reliable drive options include the Apple USB SuperDrive ($29, USB-A only), the LG GP60NB50 (USB-A, around $25-35), and the LG GP65NB60 (USB-A with USB-C adapter, around $30-40). For M-series Macs with only USB-C ports, pair any USB-A drive with a powered hub rather than a bare dongle adapter. This single step eliminates the majority of mid-rip power errors that users report.
Your Mac should be running macOS 11 Big Sur or later to get the best compatibility with current versions of HandBrake (1.8.x) and MakeMKV (1.17.x). Both apps run natively on Apple Silicon (M1, M2, M3, M4) without Rosetta translation.
Top DVD Copy & Ripping Software for Mac: Free vs. Paid
The software market divides cleanly into free open-source tools that cover 95% of use cases and paid apps that add convenience features. The table below covers the tools most relevant to Mac users in 2025-2026.
| App | Price | Output Formats | Copy Protection | Apple Silicon Native | Best For |
|---|---|---|---|---|---|
| HandBrake 1.8 | Free | MP4, MKV | Via libdvdcss/VLC | Yes | Compressed encodes for iPhone/Apple TV |
| MakeMKV 1.17 | Free (beta) / $5 permanent | MKV, ISO | Built-in | Yes | Full-quality backups with menus |
| VLC 3.0 | Free | Multiple | Built-in | Yes | Quick playback rips, no re-encode |
| MacX DVD Ripper Pro | $59.95 one-time | MP4, MKV, ISO, 300+ | Built-in | Yes | Batch ripping with GUI presets |
| iSuper DVD Ripper | $19.99 (App Store) | MP4, MOV, AVI | Limited | Yes | Sandboxed App Store convenience |
| FFmpeg | Free | Any | Via libdvdcss | Yes | Command-line automation and scripting |
For most users, HandBrake plus MakeMKV covers every scenario at zero cost. MakeMKV handles the decryption and full-disc backup; HandBrake handles compression for device-friendly files. Paid tools like MacX DVD Ripper Pro add a cleaner GUI and batch queue, but users in community discussions report occasional incomplete rips and subtitle rendering problems on certain discs, so the premium price does not guarantee a smoother experience on every title.
convert and edit video files on Mac
Step-by-Step: Rip a DVD on Mac with HandBrake and VLC
HandBrake is a free, open-source video encoder that reads DVD source files and outputs compressed video. It does not bypass CSS copy protection on its own. The standard workaround is installing VLC 3.0 first, which places the libdvdcss decryption library on your system that HandBrake then uses automatically.
Preparation
- Download and install VLC 3.0 for Mac from the official VideoLAN site. Launch it once so it registers its libraries, then quit.
- Download HandBrake 1.8 for Mac from handbrake.fr. Open the DMG, drag HandBrake to Applications, and launch it.
- Insert your DVD into the external drive. Wait 10-15 seconds for macOS to mount the disc.
Ripping the DVD
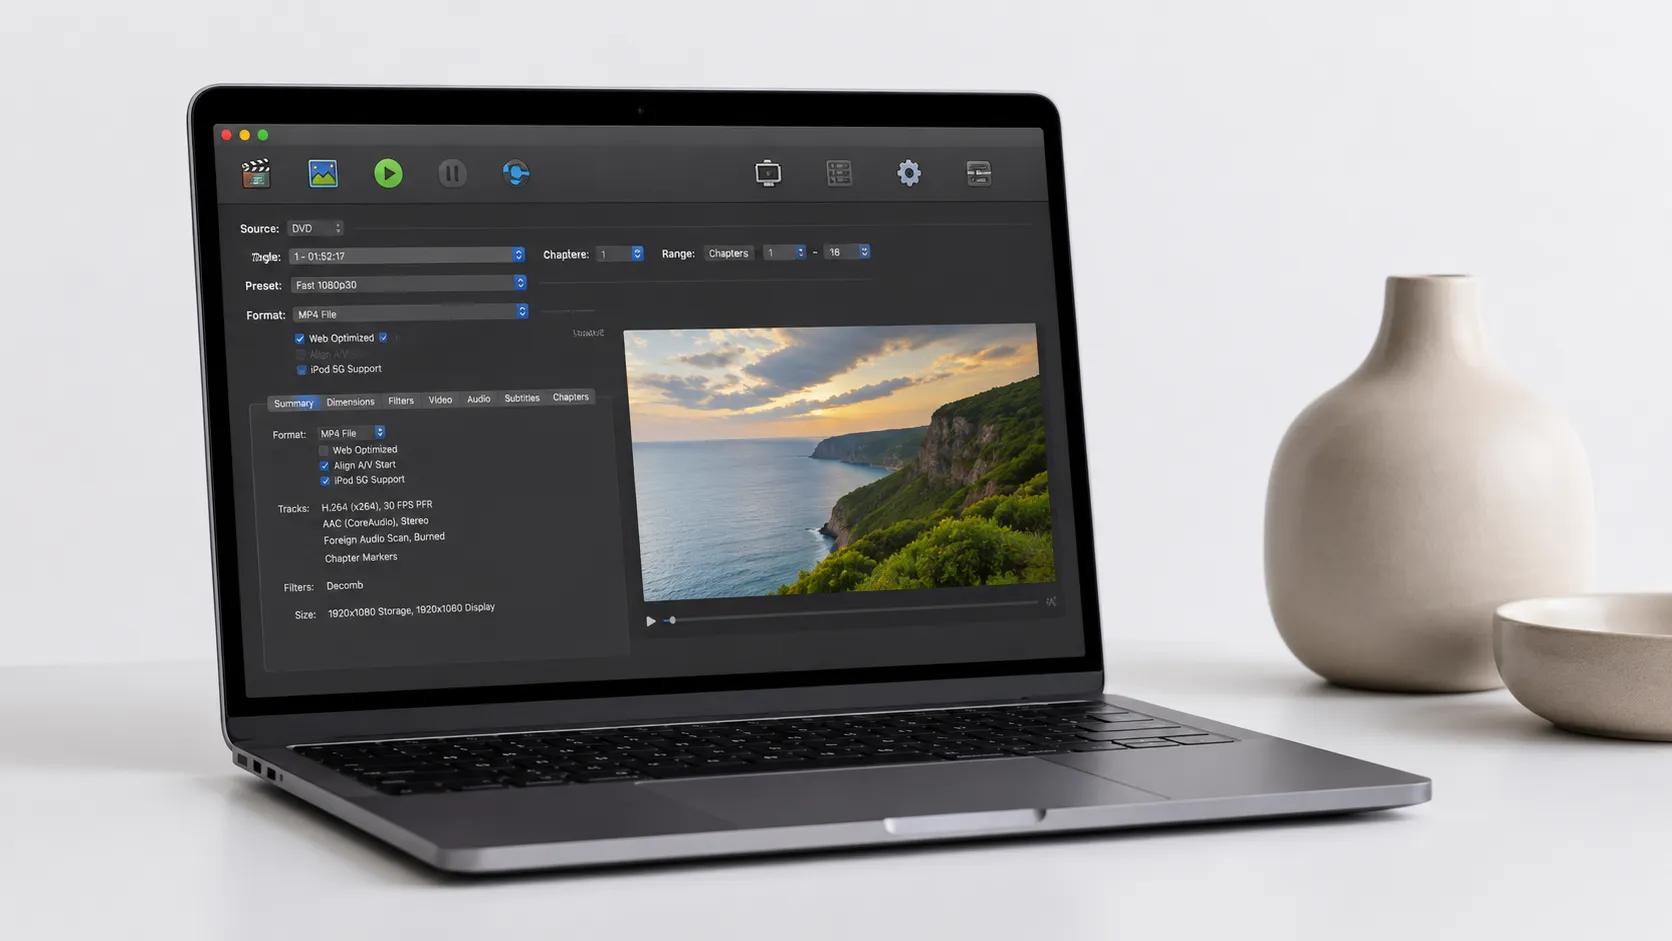
- In HandBrake, click “Open Source” and select the DVD drive from the sidebar (it appears as a disc icon).
- HandBrake will scan all titles. For a feature film, select the longest title, which is almost always the main movie. For TV discs, use the “Chapters” dropdown to identify individual episodes.
- Choose a preset. “Fast 1080p30” works well for Apple TV and Mac playback. For iPhone storage, “Super HQ 480p30 Surround” keeps file size under 1.5 GB for a 2-hour film. For the best quality-to-size ratio, select H.265 (HEVC) encoding in the Video tab.
- Set the output file path under “Save As” at the bottom of the window.
- Click “Start Encode”. On an M2 MacBook Air, a 2-hour DVD encodes to H.264 MP4 in roughly 20-25 minutes using VideoToolbox hardware acceleration.
Subtitle and Audio Tips
Before encoding, click the “Subtitles” tab and add any subtitle tracks you want embedded. For MP4 output, use “Burned In” if you always want them visible, or “Soft” if you want to toggle them in playback. The “Audio” tab lets you include multiple audio tracks (useful for foreign-language versions). HandBrake drops extra tracks by default, so check this tab before starting a long encode.
Full-Quality Backups with MakeMKV
MakeMKV is the tool of choice when you want a complete, uncompressed backup of a disc including menus, bonus features, and all audio tracks. It is distinct from HandBrake in one important way: it does not re-compress the video, so the output MKV file is large (typically 4-8 GB for a feature film) but pixel-for-pixel identical to the source.
MakeMKV’s beta version has been free for years. The developer periodically issues a new registration code on their forum, which extends the free period. A permanent license costs $5. To use it:
- Download MakeMKV from makemkv.com and install it.
- Insert your DVD. MakeMKV auto-detects the drive and shows a large disc icon. Click it to scan.
- After scanning, check the titles and tracks you want to back up. Deselect bonus content you do not need to reduce file size.
- Choose an output folder and click “Make MKV”.
Many experienced users treat MakeMKV as the first step and HandBrake as the second: rip to MKV first for a safe master copy, then run HandBrake on the MKV file to create a compressed version for daily use. This approach also sidesteps the libdvdcss issue entirely, since MakeMKV handles its own decryption.

transfer media files between iPhone and Mac
Handling Copy Protection and Output Formats
Copy protection on DVDs comes in several forms. CSS (Content Scramble System) is the most common and is handled by libdvdcss (via VLC) or MakeMKV. Region coding restricts playback by geography. Most region-locked discs can be ripped by software that ignores the region flag. Macrovision/APS affects analog output and is irrelevant for digital ripping.
For output format, the choice comes down to intended use:
- MP4 (H.264 or H.265): Best for iPhones, iPads, Apple TV, and Plex. Widely compatible. H.265 at the same visual quality runs about 40-50% smaller than H.264.
- MKV: Best for media servers and archiving. Supports more subtitle formats (including PGS/image-based subs from DVDs) and unlimited audio tracks.
- ISO image: An exact clone of the disc, including menus and all content. Requires a player that supports ISO mounting (VLC, Infuse, or a Plex plugin). File sizes match the original disc (4-8 GB for single-layer, up to 8.5 GB for dual-layer).
For Apple TV 4K playback, MP4 with H.265 at 2500-4000 kbps video bitrate delivers quality indistinguishable from the source DVD. For archiving on a NAS, MKV from MakeMKV is the safer long-term choice because it preserves everything without quality loss.
Troubleshooting Common Ripping Problems on Mac
DVD ripping fails in predictable ways. Here are the most common issues and their fixes.
HandBrake shows “No Valid Source Found”: The disc is copy-protected and libdvdcss is not installed. Open VLC once and try again. If VLC is already installed, try re-downloading the latest version from videolan.org.
Rip stops partway through or produces a corrupted file: This is almost always a disc read error caused by scratches or a power-starved drive. Clean the disc with a lint-free cloth from the center outward. Move the drive to a powered USB hub. If errors persist, MakeMKV has better error recovery than HandBrake and may complete the rip where HandBrake fails.
Subtitles are missing or display incorrectly: DVD subtitles are stored as bitmap images, not text. HandBrake can burn them in or pass them through as a VOBSUB track. If subtitles look wrong in your player, switch from “Soft” to “Burned In” in HandBrake’s Subtitles tab and re-encode.
MacX DVD Ripper Pro only outputs MP4 or stops mid-rip: This is a documented complaint in user reports. The app’s ISO Clone function is also inconsistent on newer macOS versions. If you hit these walls, switching to the free MakeMKV plus HandBrake workflow resolves them without additional cost.
Drive not recognized by macOS: Some USB-A to USB-C adapters do not supply enough power. Use a powered hub. Also check System Information (Apple menu, About This Mac, System Report, USB) to confirm the drive appears at all before blaming the software.
customize your Mac setup for media playback
Alternatives Worth Knowing
Beyond HandBrake and MakeMKV, a few other tools fill specific gaps.
VLC 3.0 can rip directly: File, Convert/Stream, then select the DVD source. Output quality is limited compared to HandBrake, but it requires no additional setup and works for quick one-off rips.
FFmpeg is a command-line tool that handles virtually any format conversion. It requires libdvdcss to be installed separately. The learning curve is steep, but it is the right choice for scripted batch ripping of large collections. A basic FFmpeg command to rip a DVD title looks like: ffmpeg -i dvd:// -map 0 output.mkv.
iSuper DVD Ripper is available on the Apple App Store, which makes it the only sandboxed option in this list. The sandbox limits its ability to access certain disc structures, so it works reliably on unprotected discs but struggles with commercial titles. At $19.99, it is hard to justify over the free alternatives for most users.
MacX DVD Ripper Pro at $59.95 offers a polished batch workflow and 300+ output presets. It is worth considering if you are ripping a large collection and want preset profiles for specific devices without manual HandBrake configuration. The caveat: test it on a few discs before committing to a bulk project.
which Mac hardware handles heavy encoding workloads best
Legal Considerations
The legality of ripping DVDs you own is genuinely ambiguous, and articles that call it straightforwardly legal are misleading. In the United States, the Digital Millennium Copyright Act (DMCA) prohibits circumventing technological protection measures, which includes CSS encryption, even for personal use. No court has definitively ruled that personal-use ripping is an exemption.
In the United Kingdom, a personal copying exception was introduced in 2014 and then struck down in 2015, leaving the legal position unclear. The European Union has a patchwork of national laws, with some countries (France, Germany) allowing private copies under certain conditions.
The practical reality is that enforcement against individuals ripping their own discs for personal use is essentially nonexistent. Distributing ripped content is a separate matter entirely and clearly illegal. The grey area exists specifically for personal archiving, and it is worth understanding that distinction before proceeding.
Key Takeaways
- Every modern Mac requires an external USB or USB-C optical drive to read DVDs. Use a powered hub to avoid mid-rip failures.
- HandBrake (free) plus libdvdcss (via VLC) handles most ripping tasks. MakeMKV (free in beta) is the better choice for full-quality, full-disc backups.
- For Apple device compatibility, MP4 with H.265 encoding at 2500-4000 kbps delivers source-quality output at roughly half the file size of H.264.
- Copy protection on commercial DVDs requires either libdvdcss or MakeMKV’s built-in decryption. HandBrake alone will fail on protected discs.
- Ripping DVDs you own for personal archiving sits in a legal grey area in most countries. Distributing ripped content is illegal regardless of jurisdiction.
Frequently Asked Questions
Do I need an external DVD drive to rip DVDs on a Mac?
Yes. No Mac model sold since 2012 includes a built-in optical drive. You need a USB or USB-C external DVD drive to read discs. Models like the Apple USB SuperDrive and third-party drives from LG or Samsung work reliably, though some bus-powered drives can struggle with power on certain USB-C hubs.
Can HandBrake rip copy-protected DVDs on Mac?
HandBrake alone cannot bypass CSS encryption found on most commercial DVDs. You need to install the libdvdcss library (available via Homebrew) or open the disc in VLC first, which loads the decryption library into memory. Once that is in place, HandBrake can read and encode the disc normally.
What is the best output format when ripping a DVD on Mac?
MP4 with H.264 encoding is the safest choice for broad compatibility across iPhones, Apple TV, and Mac. MKV is better if you want to preserve multiple audio tracks, subtitles, or chapters without re-encoding. For a lossless full-disc backup with menus intact, ISO or an MKV created by MakeMKV is the right call.
Is ripping a DVD for personal use legal?
This is genuinely unsettled in most jurisdictions. In the United States, the DMCA prohibits circumventing copy protection even for personal use, which technically covers CSS-encrypted discs. The practical enforcement risk for personal archiving is low, but the legal grey area is real. Laws differ in the UK, EU, and Australia, so check your local rules before proceeding.
How long does it take to rip a DVD on a Mac with Apple Silicon?
On an M2 or M3 Mac using HandBrake with VideoToolbox hardware acceleration, a standard 2-hour DVD typically encodes to H.264 MP4 in 15-25 minutes. MakeMKV, which does not compress the video, can complete a full disc backup in as little as 20-30 minutes depending on disc condition and drive speed.
Recommended reading

Best Mac Themes 2026: Customize macOS Like a Pro
Discover the best Mac themes, tools, and customization methods for macOS. Wallpapers, icon packs, widgets, dark mode tips, and app recommendations.

How to Convert and Burn MKV Video on Mac (2026)
Complete guide to converting MKV files on Mac and burning them to DVD or Blu-ray. Free and paid tools, step-by-step instructions, and troubleshooting tips.

Free DVD Burner for Mac: Burn Data, Video & ISO DVDs
The best free DVD burner for Mac: burn data DVDs, video DVDs, and ISO images with Finder and the free Burn app. Free DVD burning software, step by step, plus troubleshooting.