How to make movie and edit video with iMovie
![]()
Oce 22, 2013 12:12 pm / Posted by Nelson Peter to Mac CategoryFollow @MacDVD_Studio
We've used iMovie for a couple of years to make movies (well, short videos). It's a great tool: Easy to use, and inexpensive! Here, in a nutshell, is how you can do it too. This program is included free with new Mac computers or available for purchase as part of the iLife bundle. We'll show you how to do it without an expensive camcorder - from start to finish, and on the cheap.
The following steps will tell you some basic operations and advanced tips about making movie and edit video using iMovie. It will include three parts.
Part1. How to make movie with iMovie;
Part2. How to edit video clips with iMovie;
Part3. How to burn iMovie movie to DVD or export iMovie project;
Getting Started: Preliminaries and Filming
Get Your Idea: It can be a satirical short, or even a friend's wedding. Then either write a script, or write an outline telling you where your video clips go in your movie.
Find Music and Sound Clips: Get the music and sound effects you want to use. Put them into iTunes for easy access.
Create Your Video Clips: Film clips for every scene in your script, or find video clips for each topic in your outline. The video formats supported by iMovie are: MP4, M4V, MOV, AVI, 3GP. If you got a unsupported video, such as FLV, WMV, MKV, VOB, MPEG, DAT, ASF etc, use a Mac video converter, which can convert video to iMovie acceptable format. For DVD into iMovie, this Mac DVD Ripper could you do the job. If you want to get YouTube video into iMovie, you can use this Mac YouTube downloader
Prepare to Store: Create a folder on your Mac where you will store your iMovie project and everything associated with it. We'll call it your iMovie folder.
Import Video Clips Onto Your Mac: We use Image Capture for this. Create a folder inside your iMovie folder (your video clips folder) and import your video clips into it. We dislike importing videos into iPhoto; it fills up iPhoto quickly with BIG files.
How to make Movie with iMovie
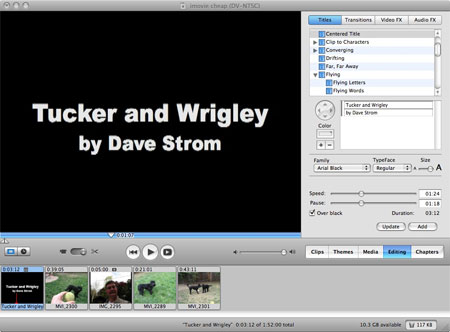
Start iMovie and familiarize yourself with the application:
Movie Monitor: For watching the movie. (Since no clip is selected in our screenshot, the movie monitor is black.)
The Pane: To select your media and effects. (Our screenshot shows the Pane in clips mode, with a few video clips imported into it.)
The Viewer: To see every video clip, photo, and sound in your movie. The Viewer can be a clip viewer for a clip-based view of your video clips and photos, or a timeline viewer for a time-based view that shows iMovie's two audio tracks. Use the timeline/clip button ![]() to switch between them. The clip-based view is shown in the screenshot below. You can select one clip in the Viewer to play or edit, or several or all the clips in the Viewer to play them.
to switch between them. The clip-based view is shown in the screenshot below. You can select one clip in the Viewer to play or edit, or several or all the clips in the Viewer to play them.

1. Click the clips button below the Pane, and option-drag the video clips from your video clips folder into the Pane. (When you option-drag instead of drag, you leave a backup copy of the video clip in the Pane. Refer to our notes at the end if you use a camcorder.)
2. Edit your video clips. The most common edit is crop.
Select the clip in the viewer. (We suggest that you leave the video clips in the Pane unedited, as backups.)
Set the little arrowheads at each end in the movie monitor, and drag them to where you want your video clip to be cropped. The area in blue will be removed, the area in gold will remain.
From the Edit menu, select Crop.

3. Add titles.
Click the Editing Pane button, and then click Titles. The title list appears.
Select the kind of title you want, such as Zoom or Centered Title.
Type the title into the text box(es).
Choose the duration of the title by adjusting the speed and pause sliders.
Decide if the title will be displayed over a black background or as part of a video clip.
If the Over black checkbox is unchecked, the title is superimposed on the video clip to the right of where you insert it into the Viewer. If you want the title to start somewhere other than the beginning of the clip, select Edit: Split Video Clip at Playhead where you want the title to start. (When you create special effects later, you can use this same trick.)
If the Over black checkbox is checked, the title is added to your movie just like a video clip. The title appears on a black background.
4. Add sounds.
Click the timeline icon to put the Viewer into timeline mode. The audio tracks appear.
Click the Media Pane button, and then click Audio.
Navigate to your music and sound effects.
Drag the sound into the Viewer audio tracks. The screenshot below shows the audio with View: Show audio waveforms selected. We find this helpful to get a visual idea of the sound.
To crop the sound, drag either end of the sound in the Viewer audio track to shorten the sound.

5. Put photos into your movie, if you wish.
Click the Media Pane button, and then click Photos.
Drag the desired photos into the Viewer, one-by-one and in the order in which you want to see them in your video.
The photo defaults to being visible for 5 seconds. You can experiment with the Ken Burns effect and the duration slider.
6. Play the movie to see if it is how you want it. Keep working on it if you don't like it!
7. Save the iMovie project. (Actually, you should have been doing this all along.)
How to edit video with iMovie
1. Making a Movie Project
After loaded the files into iMovie, choose File - New from the menu and name the project. If your footage is widescreen, ensure you choose the 'Widescreen (16:9)' option. Click 'Create'.

Tip: Understanding the iMovie 08 interface
By default, the iMovie 08 interface is split into 5 sections. Going clockwise from the top left they are the Project Library (where all iMovie projects are listed), the iMovie project window (where the existing movie is compiled), the Viewer (where video is played back), the Source Video window (where clips are viewed and selected) and the Event Library (where all available media is listed).
2. Skim video clips
Click an Event in the Event Library (iPhoto in this instance) and the Event Browser will display the associated clips.
To skim through the clips simply hover the mouse over them and move left or right. The faster the cursor is moved the faster they will skim.
To select a portion of a clip, click and drag to create a selection (a yellow rectangle appears). Now click Space to playback that section.
3. Arrange clips in iMovie
To start building a movie, drag selections directly from the Event Browser and drop them onto the empty panel (Project Window) above. Continue to add more clips in this manner to build up the movie.
If you want to add a clip between two existing clips in the Project Window, simply drag the new selection and drop it in the gap between the two existing clips.
To re-arrange a clip already in place, click once to select it (a yellow border appears) and then click and drag it to a new position.

4. Trim video clips with iMovie
To trim a clip already in the project, there are two options.
Either select the new selection by dragging and creating a yellow rectangle around it in the Project Window and choosing Edit - Trim to Selection (or press CMD+B).

Alternatively, select the clip in the Project Window then click the 'Clip Duration' icon (second in at the bottom) to enter the 'Trim Clip' window. Drag the appropriate selection here and click 'Done' when finished.
How to burn movie to DVD or export the iMovie project
1. Burn the making movie to DVD
In iMovie, select Share: iDVD to send your movie to iDVD. iDVD will open. Save the iDVD project in the same folder as your iMovie project. (If you don't have a DVD burner, select Share: QuickTime to create a QuickTime movie, and stop here.)
Edit the iDVD Project.
Pick your theme. This is the introduction to your movie that appears before you play the DVD.
In iDVD, click the Themes button. A simple one is Full Frame '05 in 5.0 Themes.
Drag a photo(s) into the iDVD theme.
Retype the text in the theme, if you'd like to.

Burn the Movie to DVD.
From iDVD, burn a disk image. (From the File menu, select Save as Disc Image.). Create a disk image rather than burn directly to a DVD so that you only do the video rendering once.
From Disk Utility, drag the disk image into its Pane, select the image, and then click the burn icon. (In order to burn a disk image or a DVD (single-layer), you must have at least 4.7 gigs free on your system hard drive. And you better have more than that.)
2. Export iMovie Project
Select the devices you want to create a file for and click Publish.

To export to YouTube, choose Share - YouTube and enter your account details, sign in and then Publish.
To export to a QuickTime movie, choose Share - Export using QuickTim, select a destination and setting from the drop down (e.g. 'Movie to QuickTime Movie') and click Save.
To export the project for playback on iTunes compatible devices (iPod/iPhone etc), select Share - iTunes.