How to Export an iMovie Project: Every Option Explained


iMovie’s export workflow trips up even experienced Mac users because the app handles saving and exporting as two entirely separate concepts. Understanding the difference, and knowing exactly which steps to follow on each device, is what separates a clean finished video from a frustrating afternoon of failed uploads.
Project vs. Video File: A Distinction That Matters
An iMovie project is an editable collection of clips, transitions, audio tracks, and metadata stored inside an iMovie library file (extension: .imovielibrary). A finished video file is a rendered, compressed output (MP4, MOV, or audio-only) that any media player or platform can read. These are not the same thing, and iMovie treats them differently.
iMovie saves your project automatically every time you edit, so there is no manual Save command. What you are doing when you “export” is asking iMovie to render a flattened, compressed copy of your timeline as a standalone file. That file cannot be re-imported into iMovie for further editing in the traditional sense.
The confusion is understandable. Most desktop software uses File > Save to write a portable file. iMovie’s library-based model is closer to how Photos manages images: everything lives inside the library until you explicitly export it. Knowing this up front prevents the common mistake of assuming your .imovielibrary file is ready to upload to YouTube.
How to Export an iMovie Project on Mac
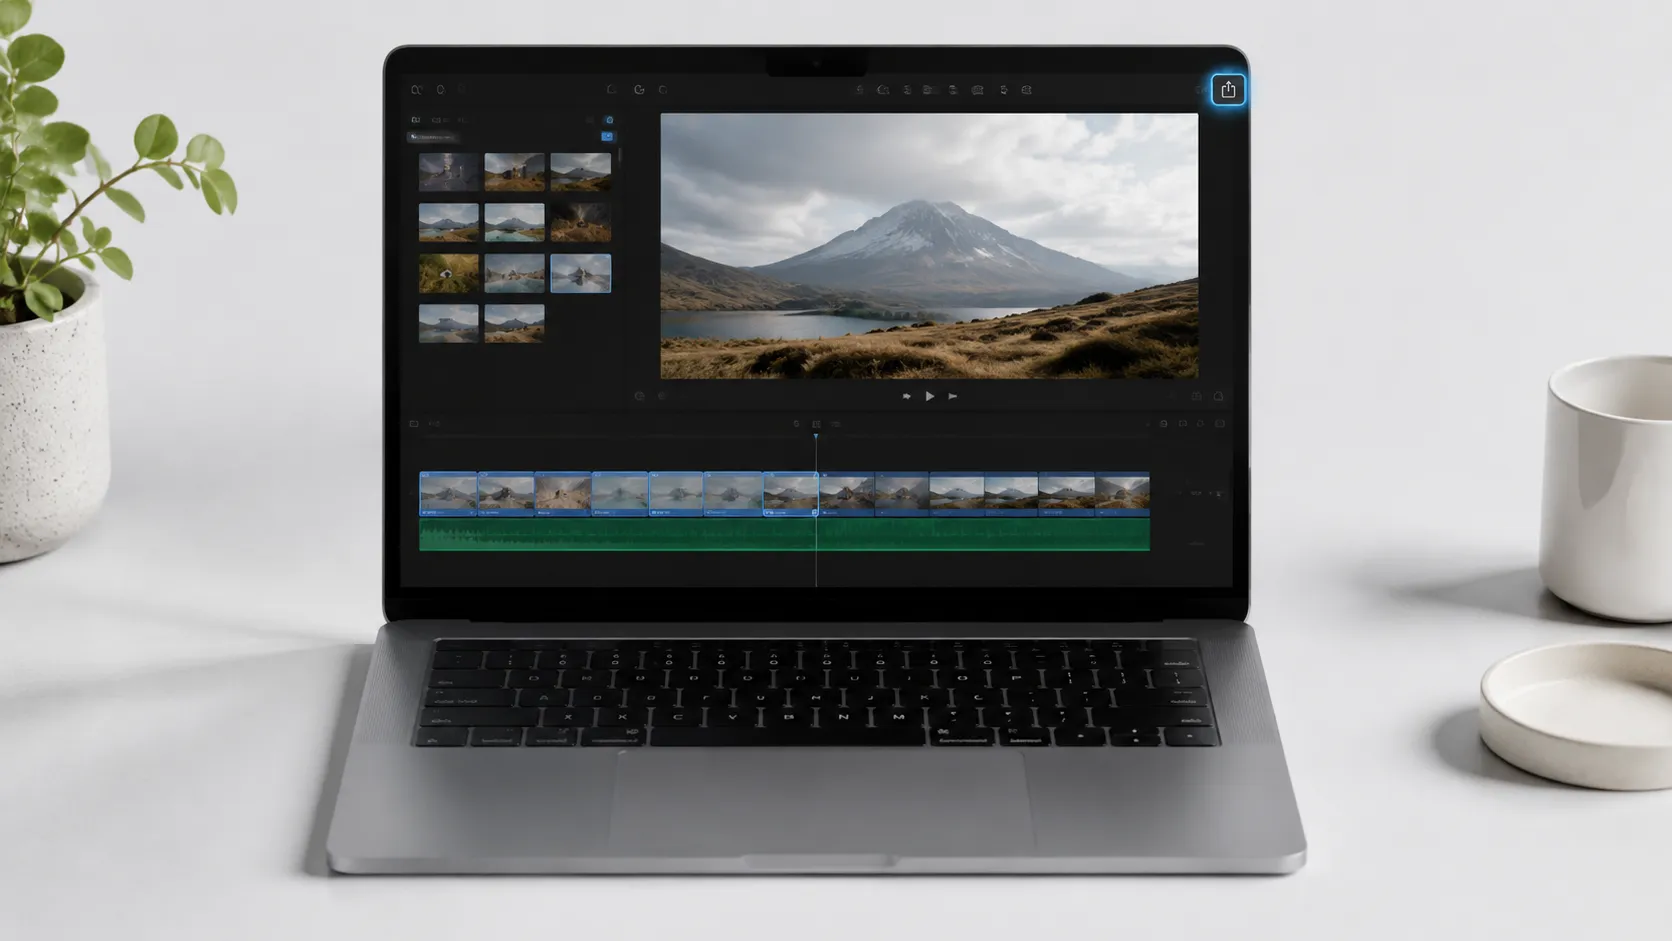
Apple’s support documentation (last updated June 5, 2026) confirms the Share button in the top-right corner of iMovie is the gateway to all export options on Mac. Here is the complete process:
- Open iMovie on your Mac and select the project you want to export from the Projects view.
- Click the Share button (the box-with-arrow icon) in the top-right corner of the iMovie window.
- Choose Export File from the dropdown menu.
- In the export dialog, set the Format to either “Video and Audio” (outputs a .mov or .mp4 file) or “Audio Only” (outputs an .m4a file).
- Set Resolution to match your source footage. For HD footage, choose 1080p. For 4K source material, choose 4K (3840x2160).
- Set Quality to High for the best balance of file size and visual fidelity.
- Set Compress to Better Quality (not Better Performance) unless you need a smaller file for a specific reason.
- Click Next, choose a save destination, name your file, and click Save.
iMovie renders the file in the background. A notification appears in the top-right corner of the screen when the export finishes. Render time scales with resolution and project length: a 10-minute 4K project on an M1 MacBook Air takes roughly 3-5 minutes, while the same project on an M4 MacBook Pro completes noticeably faster.
Using the Share Menu for Direct Platform Uploads
The Share button also offers shortcuts for YouTube, Vimeo, Facebook, and Email directly from iMovie. These shortcuts skip the local file step and upload straight from the render. They are convenient but give you less control over compression settings. For anything where quality matters, exporting a local file first and then uploading manually is the better approach.
converting and editing video on Mac with other tools
Exporting iMovie Videos on iPhone and iPad
The mobile iMovie workflow is more streamlined but has fewer options. On iPhone and iPad, iMovie encodes output as H.264 or HEVC inside an MP4 container, with resolution tied to your project settings.
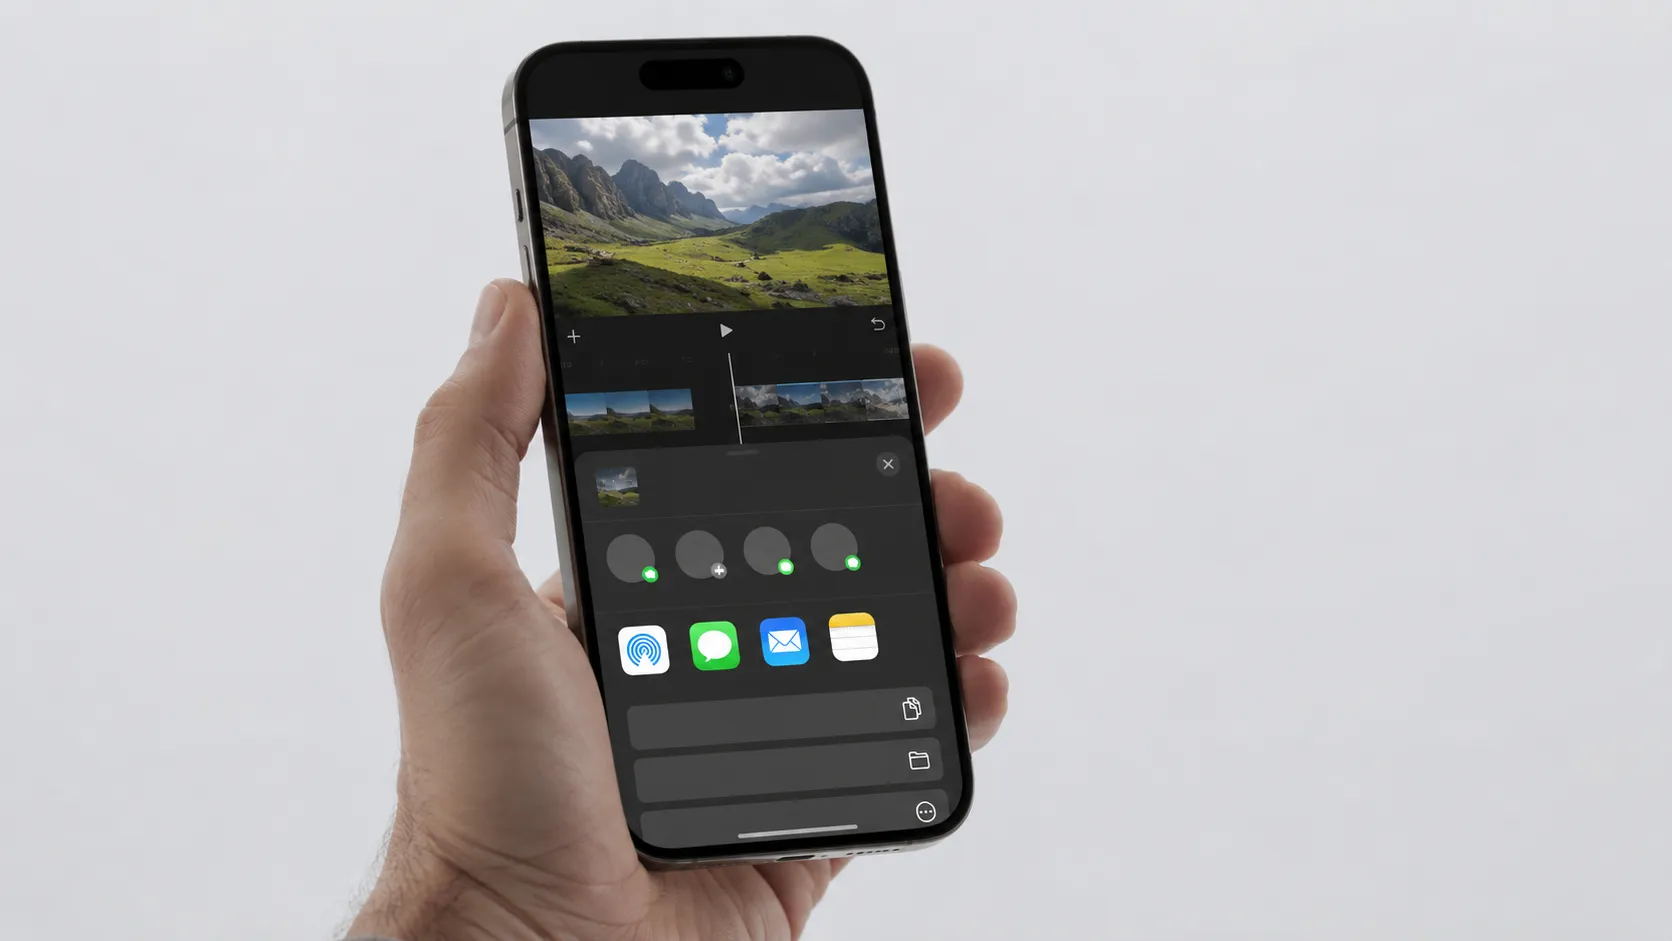
- Open iMovie on your iPhone or iPad and tap the project you want to export.
- Tap the Share icon (the box-with-arrow) at the bottom of the screen.
- Tap Export Project if you want to share the editable library, or tap the movie thumbnail at the top to get video export options.
- To save a finished video, tap the movie thumbnail, then choose Save Video.
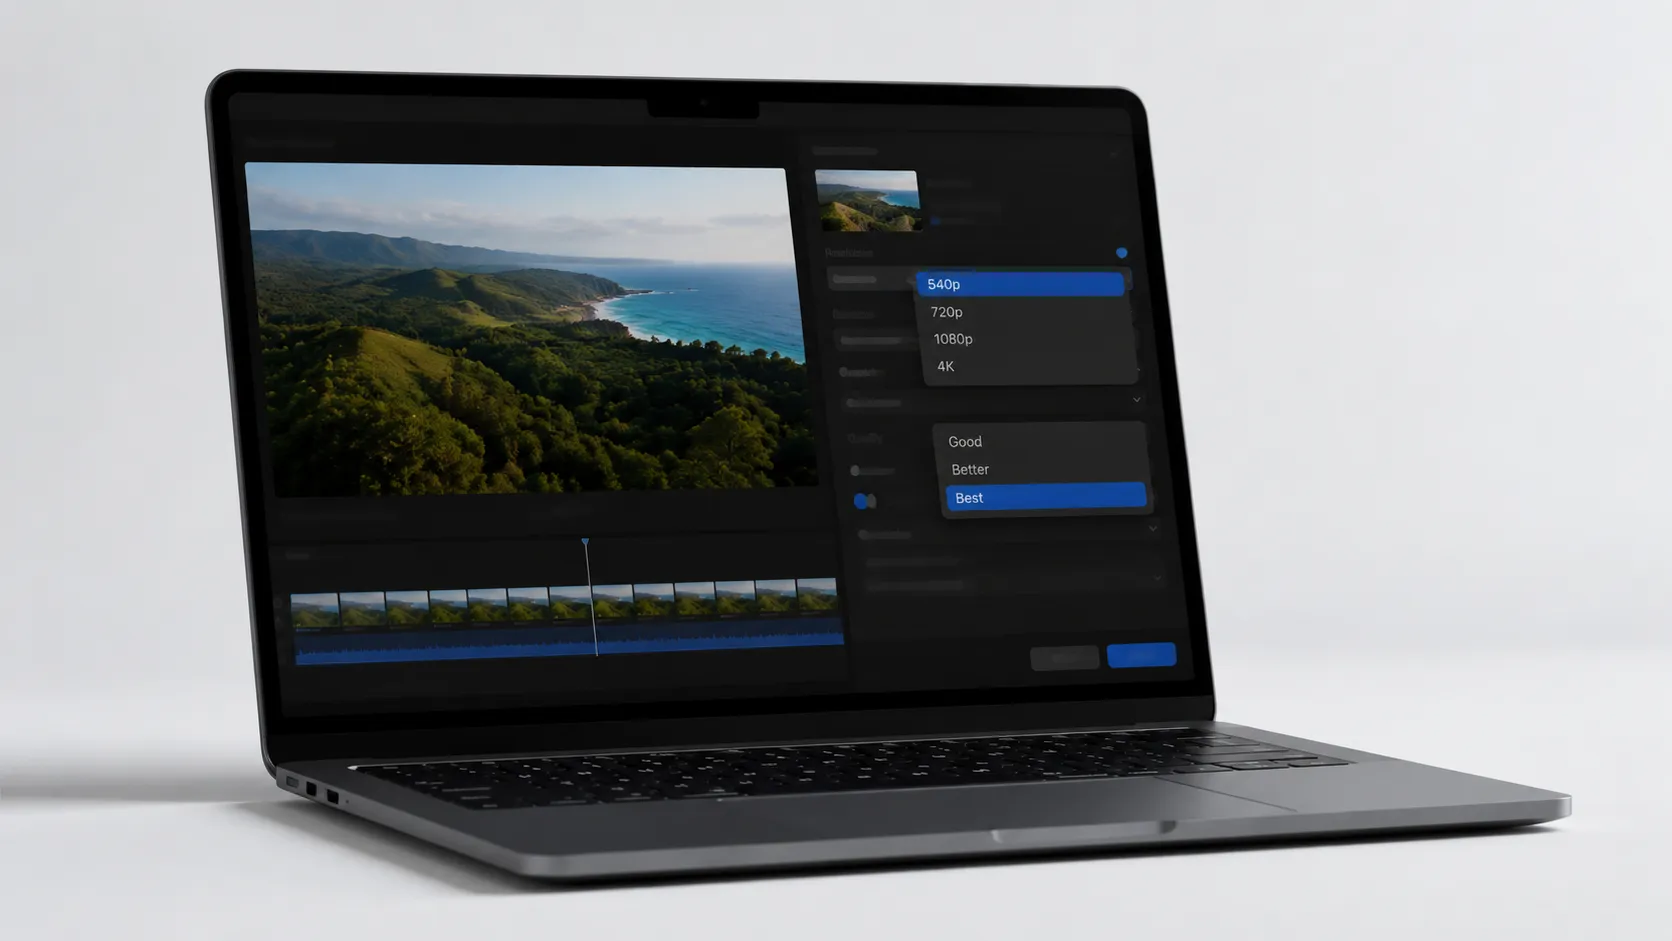
- Select your preferred resolution: 360p, 540p, 720p, 1080p, or 4K (availability depends on your device and project settings).
- Tap the resolution and iMovie renders and saves the file to your Photos library.
Some users report that the Save Video option occasionally fails to appear immediately in the Photos app after export, particularly on older iOS versions. Force-quitting Photos and reopening it resolves this in most cases. If the issue persists, check that iMovie has permission to access Photos in Settings > Privacy & Security > Photos.
Optimizing Export Settings: Resolution, Quality, and Compression
Choosing the right export settings determines both the visual quality of your output and how large the resulting file will be. The table below maps common use cases to recommended settings.
| Use Case | Resolution | Quality | Compression | Approx. File Size (10 min) |
|---|---|---|---|---|
| YouTube / Vimeo upload | 4K or 1080p | High | Better Quality | 4-8 GB (4K), 1-2 GB (1080p) |
| Instagram / TikTok | 1080p | High | Better Performance | 600-900 MB |
| Archival / Master copy | 4K | High | Better Quality | 6-10 GB |
| Email attachment | 720p | Medium | Better Performance | 200-400 MB |
| Audio podcast / voiceover | N/A | N/A | Audio Only (.m4a) | 50-120 MB |
For YouTube uploads specifically, Apple recommends exporting at the original capture resolution with High quality selected. YouTube re-encodes every upload anyway, so sending a higher-quality source file gives the platform’s encoder more data to work with, resulting in a cleaner final stream. Sending a pre-compressed 1080p file when your source is 4K is a quality trade-off that shows up clearly on large screens.
The “Better Performance” compression option uses a less aggressive encode, which results in a larger file that decodes faster on older hardware. For most modern Macs and iPhones, Better Quality is the correct choice unless you are specifically targeting playback on an older Apple TV or legacy device.
customizing your Mac workflow for video editing
Troubleshooting Common iMovie Export Problems
Export failures in iMovie tend to cluster around a handful of known issues. Here is what hands-on testing and real-world reports reveal about the most frequent problems.
Export stalls or freezes mid-render. This usually points to a corrupted clip in the timeline. Scrub through your project and look for clips that show a yellow or red warning indicator. Replace or re-import the problem clip, then retry the export.
Exported file is significantly smaller than expected, with visible quality loss. This happens when the Compress setting defaults to Better Performance or when the resolution was set lower than the source footage. Re-export with Better Quality compression and confirm the resolution matches your source material.
Share to YouTube fails with an authentication error. iMovie’s built-in YouTube sharing uses OAuth tokens that expire. Sign out of your YouTube account inside iMovie (Preferences > Accounts), sign back in, and retry. If the problem continues, export a local file and upload through a browser instead.
Exported video has no audio. Check that your audio tracks are not muted in the iMovie timeline before exporting. Also confirm you selected “Video and Audio” rather than “Audio Only” in the format dropdown.
iMovie says “Not enough disk space” even when space appears available. iMovie pre-calculates the space needed for the full render and temporary files. A 4K render can require 2-3x the final file size in temporary space. Free up additional storage or redirect the export to an external drive with more headroom.
Sharing iMovie Projects for Collaboration and Backup
iMovie projects are not portable standalone files. According to Apple’s support documentation, a project must reside within an iMovie library and cannot be exported as an independent editable file. This is one of iMovie’s most significant structural limitations.
To share an editable project with another Mac user, follow these steps:
- Quit iMovie on your Mac.
- In Finder, locate your iMovie library. By default it is at ~/Movies/iMovie Library.imovielibrary.
- Copy the entire .imovielibrary file to an external drive or upload it to a shared cloud folder (iCloud Drive, Dropbox, or Google Drive all work).
- The recipient opens iMovie, goes to File > Open Library > Other, and navigates to the copied .imovielibrary file.
- The project appears in their iMovie Projects view, fully editable.
For backup purposes, the most reliable approach is to create a dedicated backup library on an external drive. In iMovie, go to File > New Library, save it to the external drive, then drag your project from the primary library into the backup library. iMovie copies all consolidated media along with the project structure. This method, documented by independent Mac developers, ensures you are not just copying a library reference but the actual media files.
bringing older video content into your Mac workflow
Best Practices for Exporting to YouTube and Other Platforms
YouTube, Vimeo, Instagram, and TikTok each have preferred input specifications. Matching your iMovie export to these specs reduces the platform’s re-encoding penalty and preserves more of your original quality.
For YouTube, export at 3840x2160 (4K) or 1920x1080 (1080p), High quality, Better Quality compression, in the H.264 codec (the default MOV or MP4 container from iMovie). YouTube’s own guidelines recommend H.264 with a frame rate matching the source, which iMovie preserves automatically.
For Instagram Reels and TikTok, the platform maximum is 1080x1920 for vertical video. iMovie does not natively support vertical (9:16) project formats on Mac, though the iPhone version does. Shoot and edit vertical content in iMovie on iPhone, then export at 1080p. The resulting file works correctly with both platforms.
For archival, export at the highest available resolution with Better Quality compression and store the file on a drive separate from your working machine. A 10-minute 4K project at High quality typically produces a file in the 4-8 GB range, so plan storage accordingly.
Beyond iMovie: When Another Editor Makes More Sense
iMovie is capable software for straightforward editing tasks, and it is free on every Mac and iOS device. But its export limitations are real. The compression controls are minimal compared to what professional tools offer, there is no way to export a true ProRes master from the standard iMovie interface, and the library-based project model creates friction for collaboration.
For users who regularly work with 4K footage and need tighter control over output codecs, or who collaborate with editors on other platforms, tools like DaVinci Resolve (free tier) or Adobe Premiere Pro offer significantly more export flexibility. DaVinci Resolve in particular supports ProRes, DNxHD, and H.265 exports with granular bitrate control. The trade-off is a steeper learning curve and, in Premiere’s case, a subscription cost.
comparing Mac video editors and converters in depth
For most users producing content for YouTube, family archives, or social media, iMovie’s export options are sufficient. The frustration typically comes not from iMovie’s quality ceiling but from misunderstanding which settings to choose and what the library model means for file management.
Key Takeaways
- iMovie saves projects automatically inside a .imovielibrary file. Exporting creates a separate, finished video file that is not re-editable in iMovie.
- On Mac, use Share > Export File, then set Resolution to match your source, Quality to High, and Compress to Better Quality for the best output.
- On iPhone and iPad, tap the Share icon, select the movie thumbnail, and choose Save Video with your target resolution.
- To share an editable project with another Mac user, copy the entire .imovielibrary file. There is no standalone portable project format.
- For YouTube, export at your source resolution (4K or 1080p) with Better Quality compression. Let YouTube handle the final re-encode rather than pre-compressing your file.
Frequently Asked Questions
Does iMovie save automatically?
Yes. iMovie saves your project automatically every time you make a change, storing everything inside an iMovie library file (with a .imovielibrary extension) on your Mac. You never need to manually hit Save. However, this automatic saving applies only to the editable project, not to a finished exported video file.
How do I export an iMovie project as an MP4?
On Mac, click the Share button, choose Export File, then set the format to MP4 in the export dialog. On iPhone or iPad, tap the Share icon and select Save Video; iOS encodes the output as an H.264 or HEVC MP4 file automatically. MP4 is the most compatible format for uploading to YouTube, Vimeo, and social media.
How do I export an iMovie project so someone else can edit it?
iMovie does not support a portable, standalone editable project format. To share an editable project, you must copy the entire .imovielibrary file to the other person’s Mac via AirDrop, an external drive, or cloud storage. The recipient opens iMovie, goes to File > Open Library, and selects the copied library file. Both users need iMovie installed.
Why is my exported iMovie video lower quality than expected?
iMovie applies compression during export, which can soften 4K footage noticeably if you choose ‘Better Performance’ instead of ‘Better Quality’ in the compression setting. Always select High quality and Better Quality compression for archival or professional use. Also confirm your export resolution matches your source footage (e.g., 3840x2160 for 4K) rather than defaulting to a lower preset.
How do I back up an iMovie project?
The most reliable method is to create a new iMovie library on an external drive (File > New Library), then drag your project from the original library into the new one. iMovie copies all associated media along with the project data. Alternatively, you can duplicate the .imovielibrary file in Finder and store the copy on a separate drive or cloud service.
Recommended reading

How to Play Blu-Ray on Mac: Every Method Ranked
Learn how to play Blu-ray on Mac with the right external drive and software. Free VLC method, paid apps, and ripping compared for macOS Sequoia 2026.

Best Blu-Ray Ripper for Mac in 2026: Free & Paid
Find the best Blu-ray ripper for Mac in 2026. Compare MakeMKV, HandBrake, DVDFab, and EaseFab with step-by-step setup and troubleshooting tips.

Convert Facebook Video to MP3: Every Method Ranked
Learn how to convert Facebook video to MP3 using free online tools, VLC, yt-dlp, and desktop apps. Step-by-step guide with quality comparisons.